the quilt!
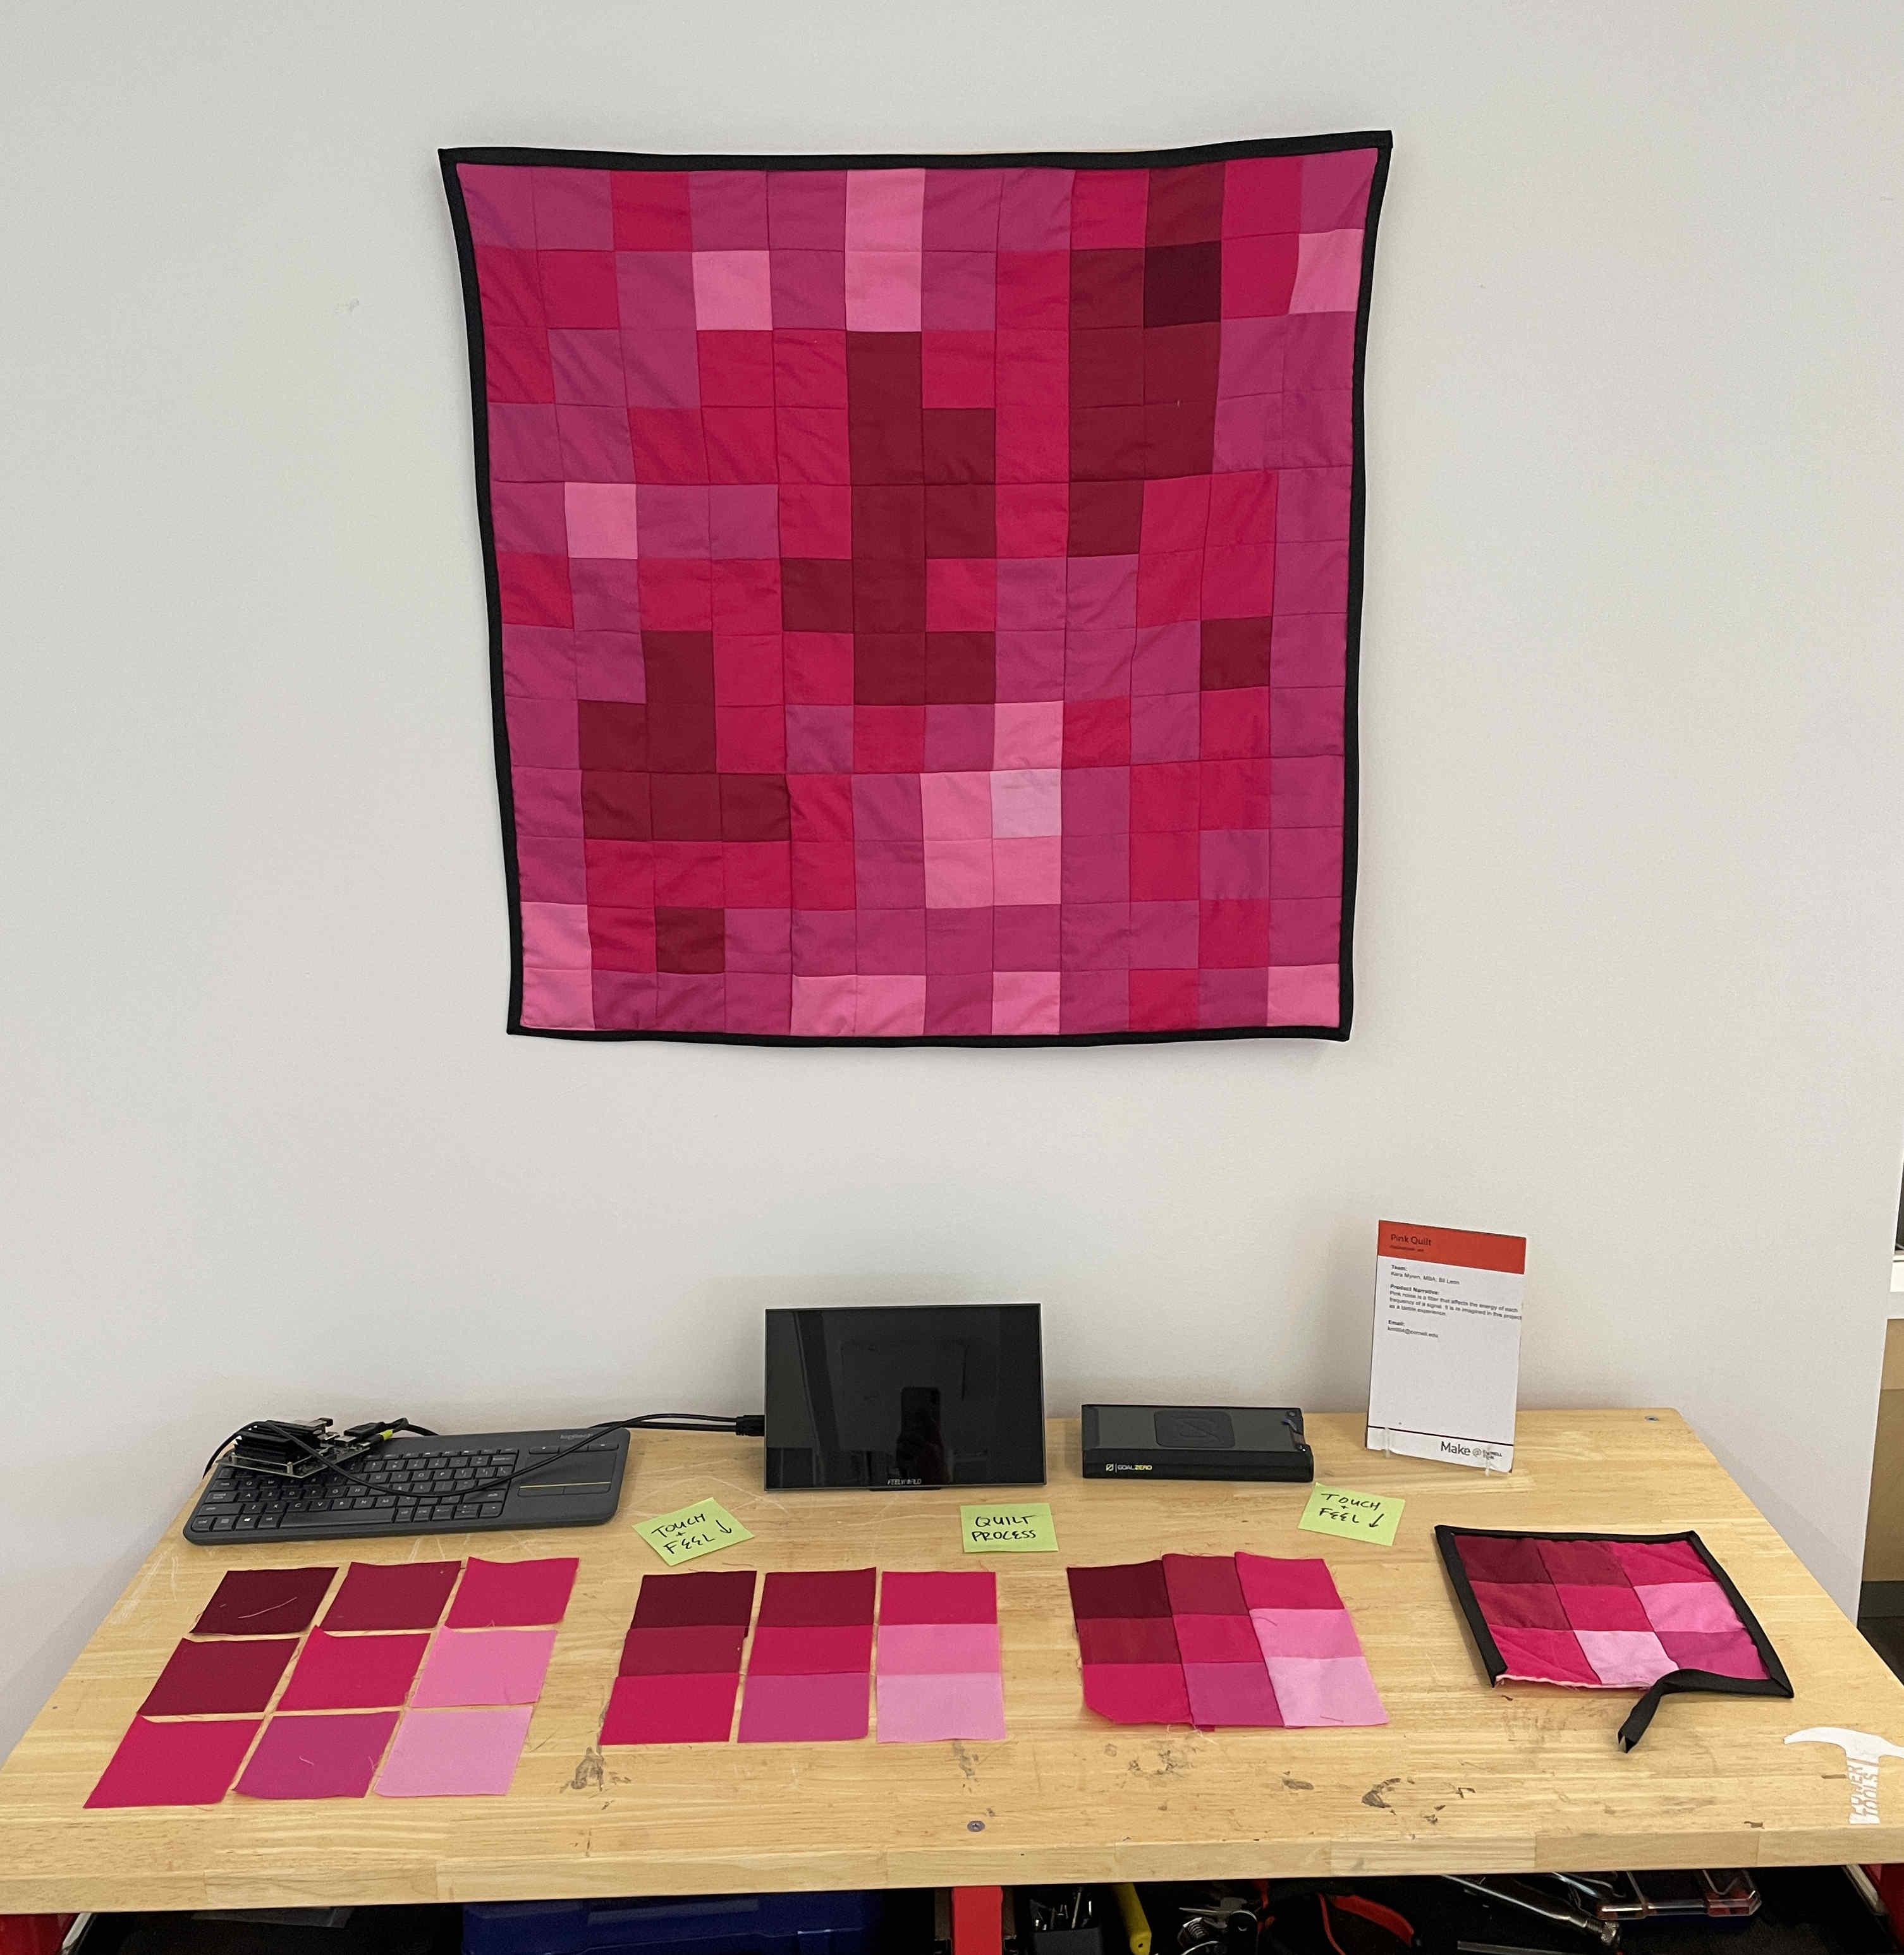
This is a quilted representation of a pink noise filter that I made through support of a micro grant from \art. It is now on display at the Cornell Tech MakerLAB.
This is a quilted representation of a pink noise filter that I made through support of a micro grant from \art. It is now on display at the Cornell Tech MakerLAB.
The inspiration for this project combined two big interests of mine: the color pink and making math quilts. My previous math quilt exploration was the Fast Fourier Transform project. I'm obsessed with the color pink, so I challenged myself to create the pinkest quilt possible. I've come across pink noise when I've looked for background sound to help me sleep, and when I took a stats class this year I started to think of how to portray these filters visually. From an auditory perspective, pink noise is "softer" than white noise, so I wanted to explore how that would look when represented in soft textile materials.
I planned to add LEDs, microphones, and a microcontroller to this project so that the quilt would light up when it detected a threshold of ambient noise. I still want to explore that idea, but ran out of time to add it to this one. There's a long history of wall tapestries as a way to tell stories, and using technology as a way to interact with the art is worth exploring.
Pink Noise is very cool. It is used all over the field of electronics. White noise is randomly distributed, but pink noise is randomly distributed by power. The dark and the light colors clump near each other in my quilt because of this distribution. Wikipedia's pink noise article is a good starting point to the concept, and I'll let them explain more of the math. From artistic and electronics perspectives, I like that randomness is never something that we are unopinionated about.
First, Bil helped me recreate pink noise in Igor Pro. We went through the process of placing signals through a FFT and visually displaying the results.
These screenshots exist on a server somewhere, and I need to dig them up.
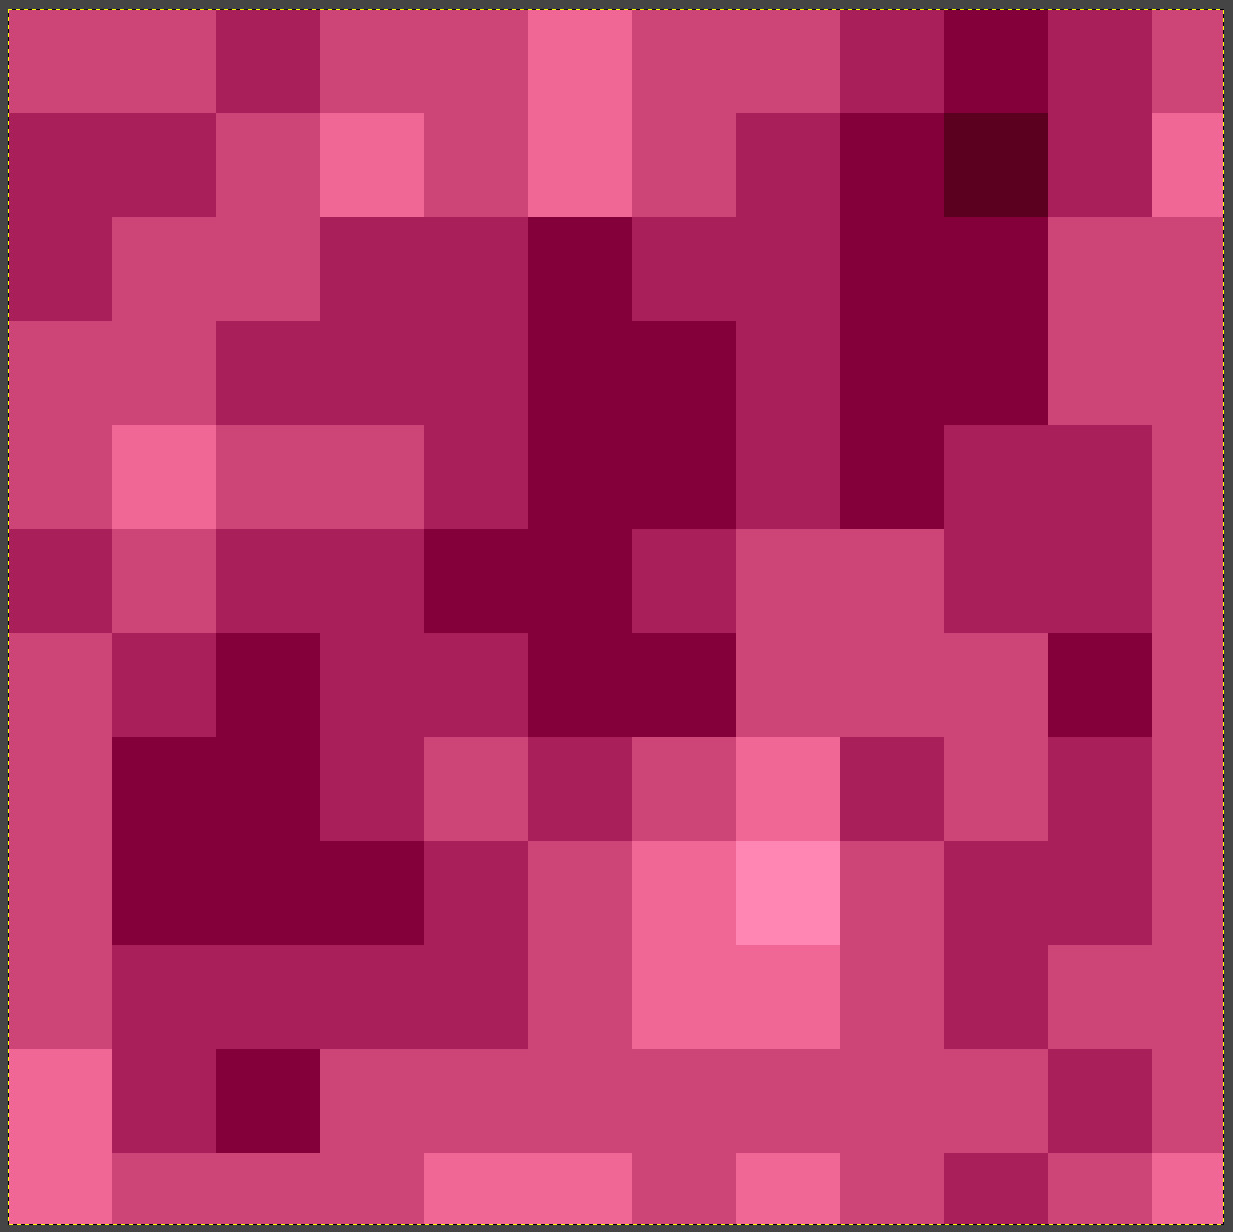
I grabbed a screenshot of pink noise from Wikipedia. Visualizations of pink noise can have up to 255 shades of gray because that is the range the computer monitors will display. I needed to reduce the scope of the color gamut to something more manageable to find in a NYC fabric store. To do this in GIMP, I used the posterize tool. I decided to go with a square motif to highlight the digitization of the design. To make this from the image, I used a blur filter called Pixelize. From there I played with the quantity of squares and the value of colors until it appeared to match the original noise filter.
Once the design was finalized, I recolored the image with a pink filter.
The image I created was a 12x12 grid. Using tools I had, it would be the most straightforward to cut 3.5" squares. Each square would have a 0.5" seam allowance on all sides, so the final quilt would measure to 30"x30". I wasn't sure if this would look too small when it was on display in the MakerLAB.
To validate, we made a scaled image and built it to a Meta Quest 3 headset. I wore that into the MakerLAB and explored places the quilt could be displayed.
Side note: it is funny how much processing applications do to images. My design is pixelated, but the headset software adds post processing to smooth out the pixels. Just let me have my pixels!
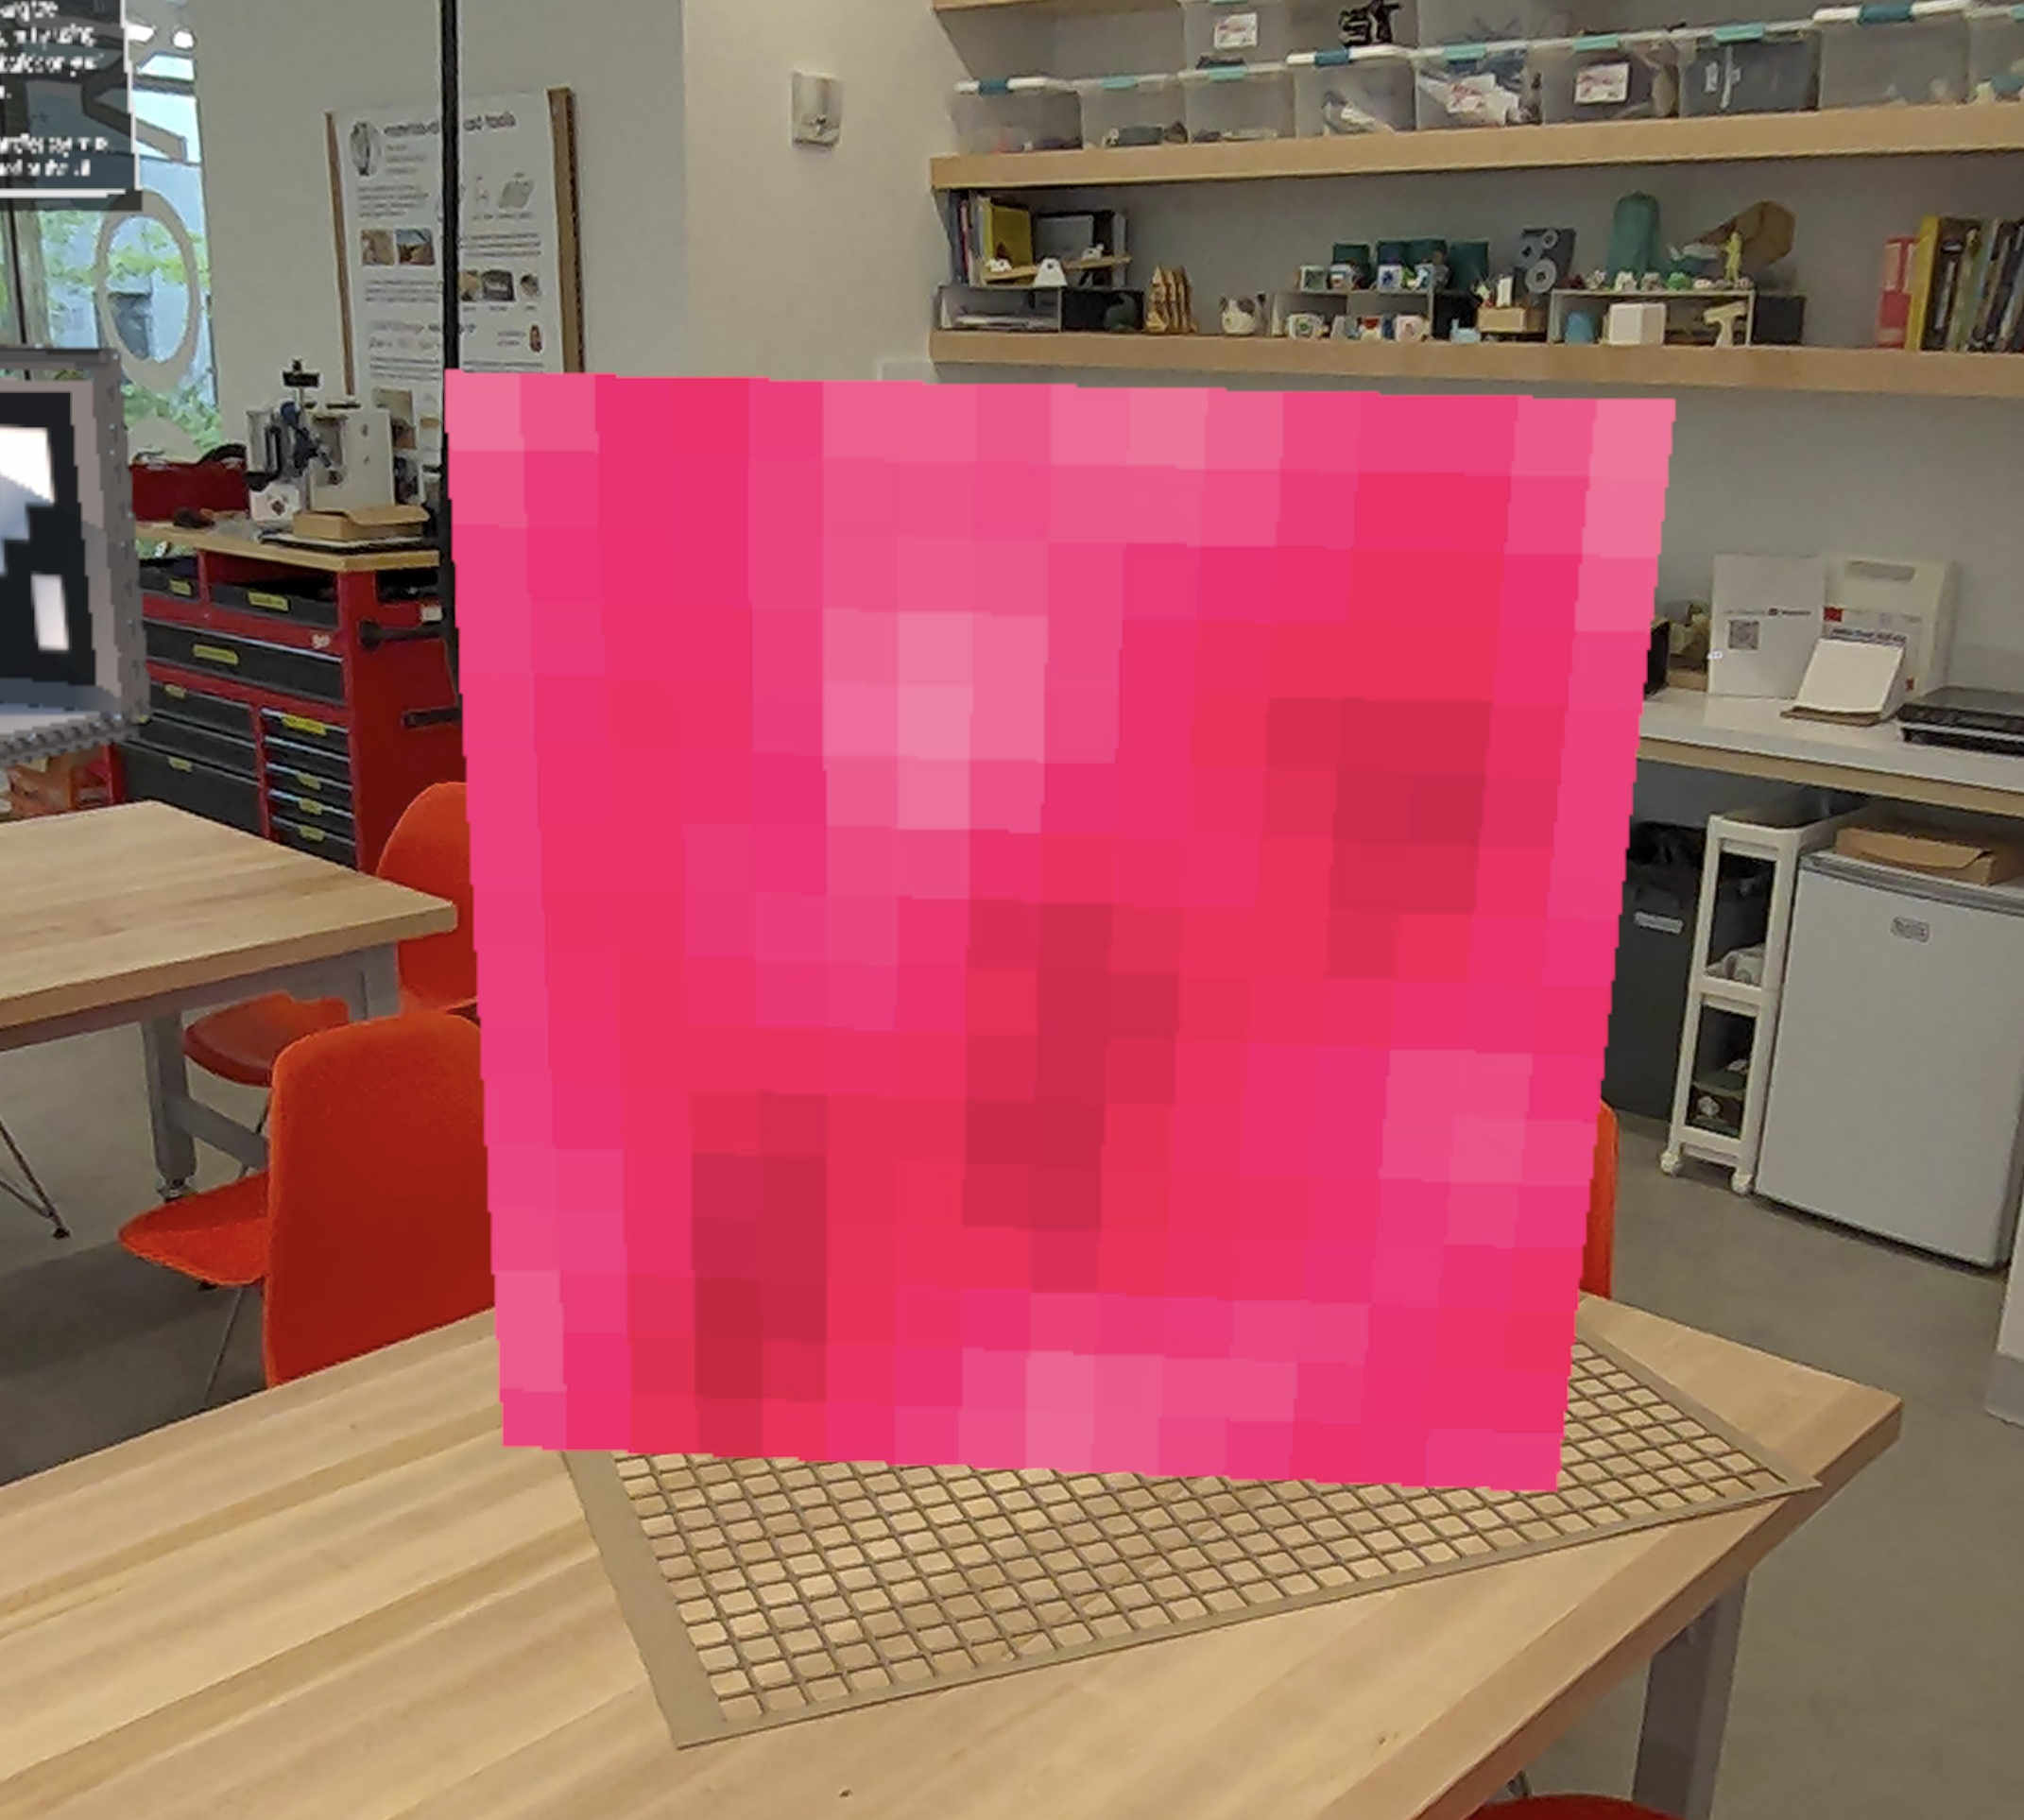
I learned that the size was great! I was able to use these images while collaborating with others who were curating the space.
Now that I had my design finalized, I had to figure out how many yards of each color I needed to buy.
Yes, I could've just counted. But I wanted to be sure I had the number correct, and I would love to do similar designs for larger projects in the future. So I used code.

First, the image was compressed to 12 pixels by 12 pixels. It's so small!
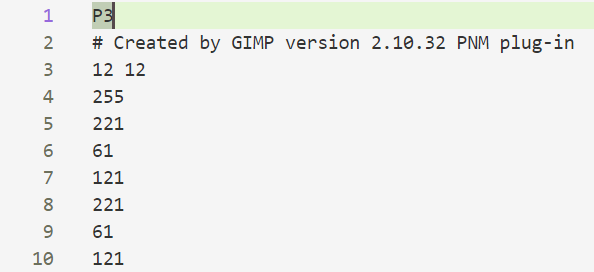
The tiny image was exported to a .ppm, which I opened in VS Code. The file is 436 lines long, and a sample of it is here. Lines 1 and 2 are header information, line 3 specifies that the image is 12x12 pixels, line 4 specifies that the color range is capped at 255, and every line after that is one component of R, G, and B for each pixel.
Since the image is 12x12 pixels, I know that each pixel here maps to one square in the quilt.
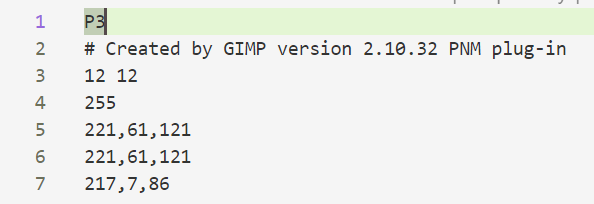
Prompted AI to reformat the data so that it displayed RGB in one line.
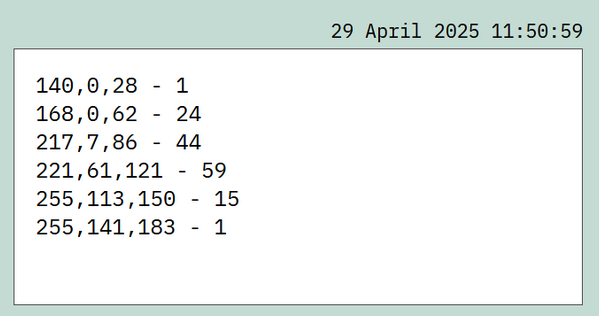
Prompted AI to total the occurrences of each RGB color.
Now that I know how many squares of each color are needed, I need to calculate how many squares can be made in a fabric.
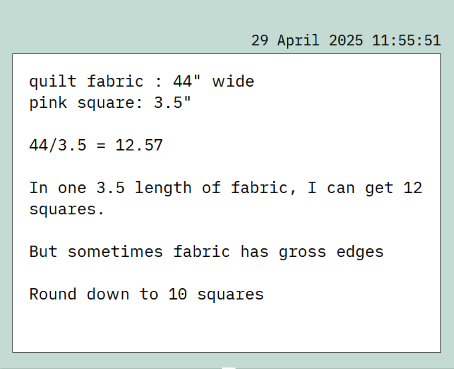
The math that 10 squares = 3.5" of fabric to purchase. This let me know that a half yard of each would probably be enough, but I rounded up to a full yard for the larger colors to account for any mistakes. Because I had extra fabric, I was able to make some small demo pieces as well.
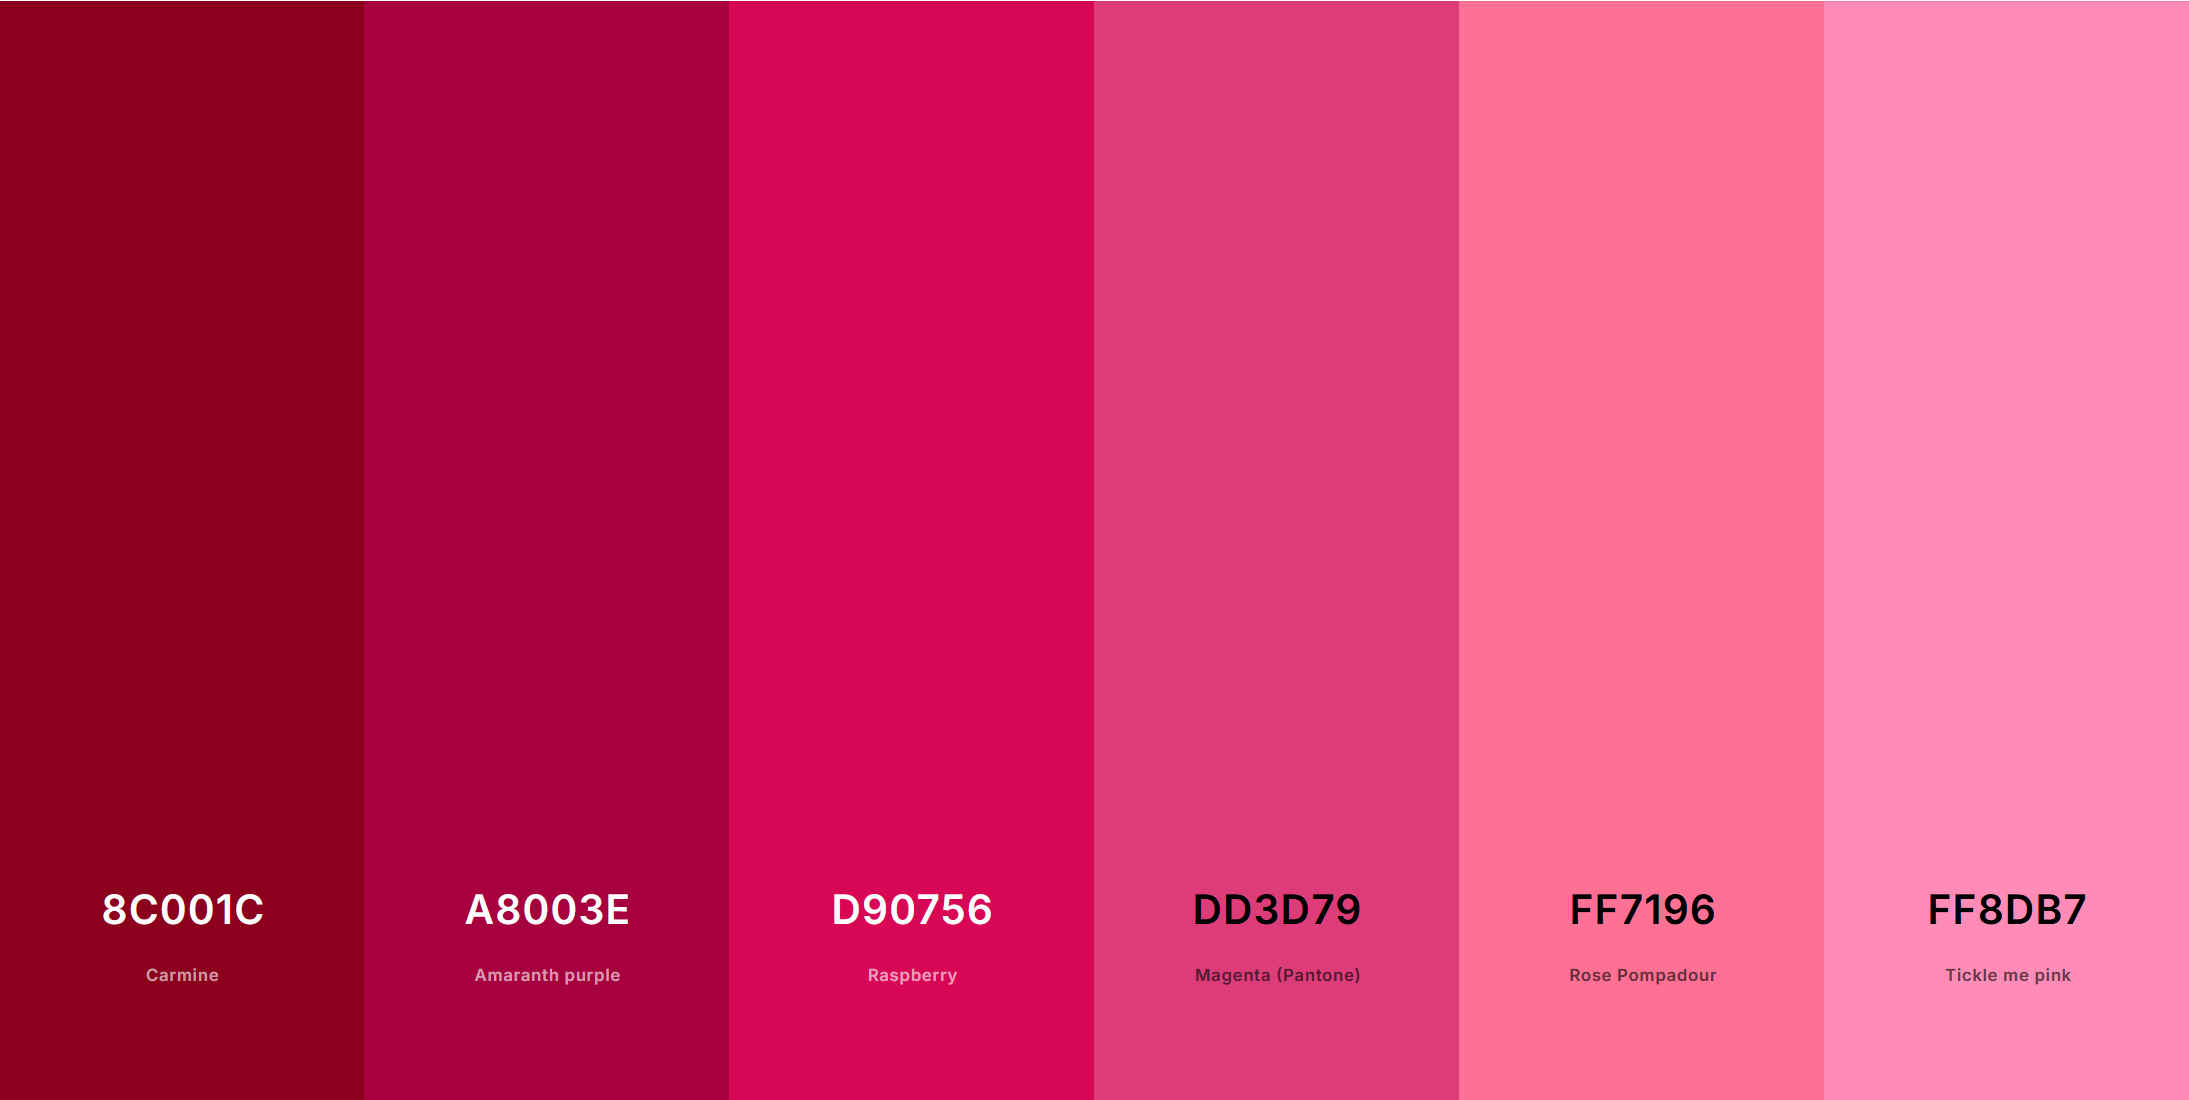
Added the colors to Coolors and took a screenshot.
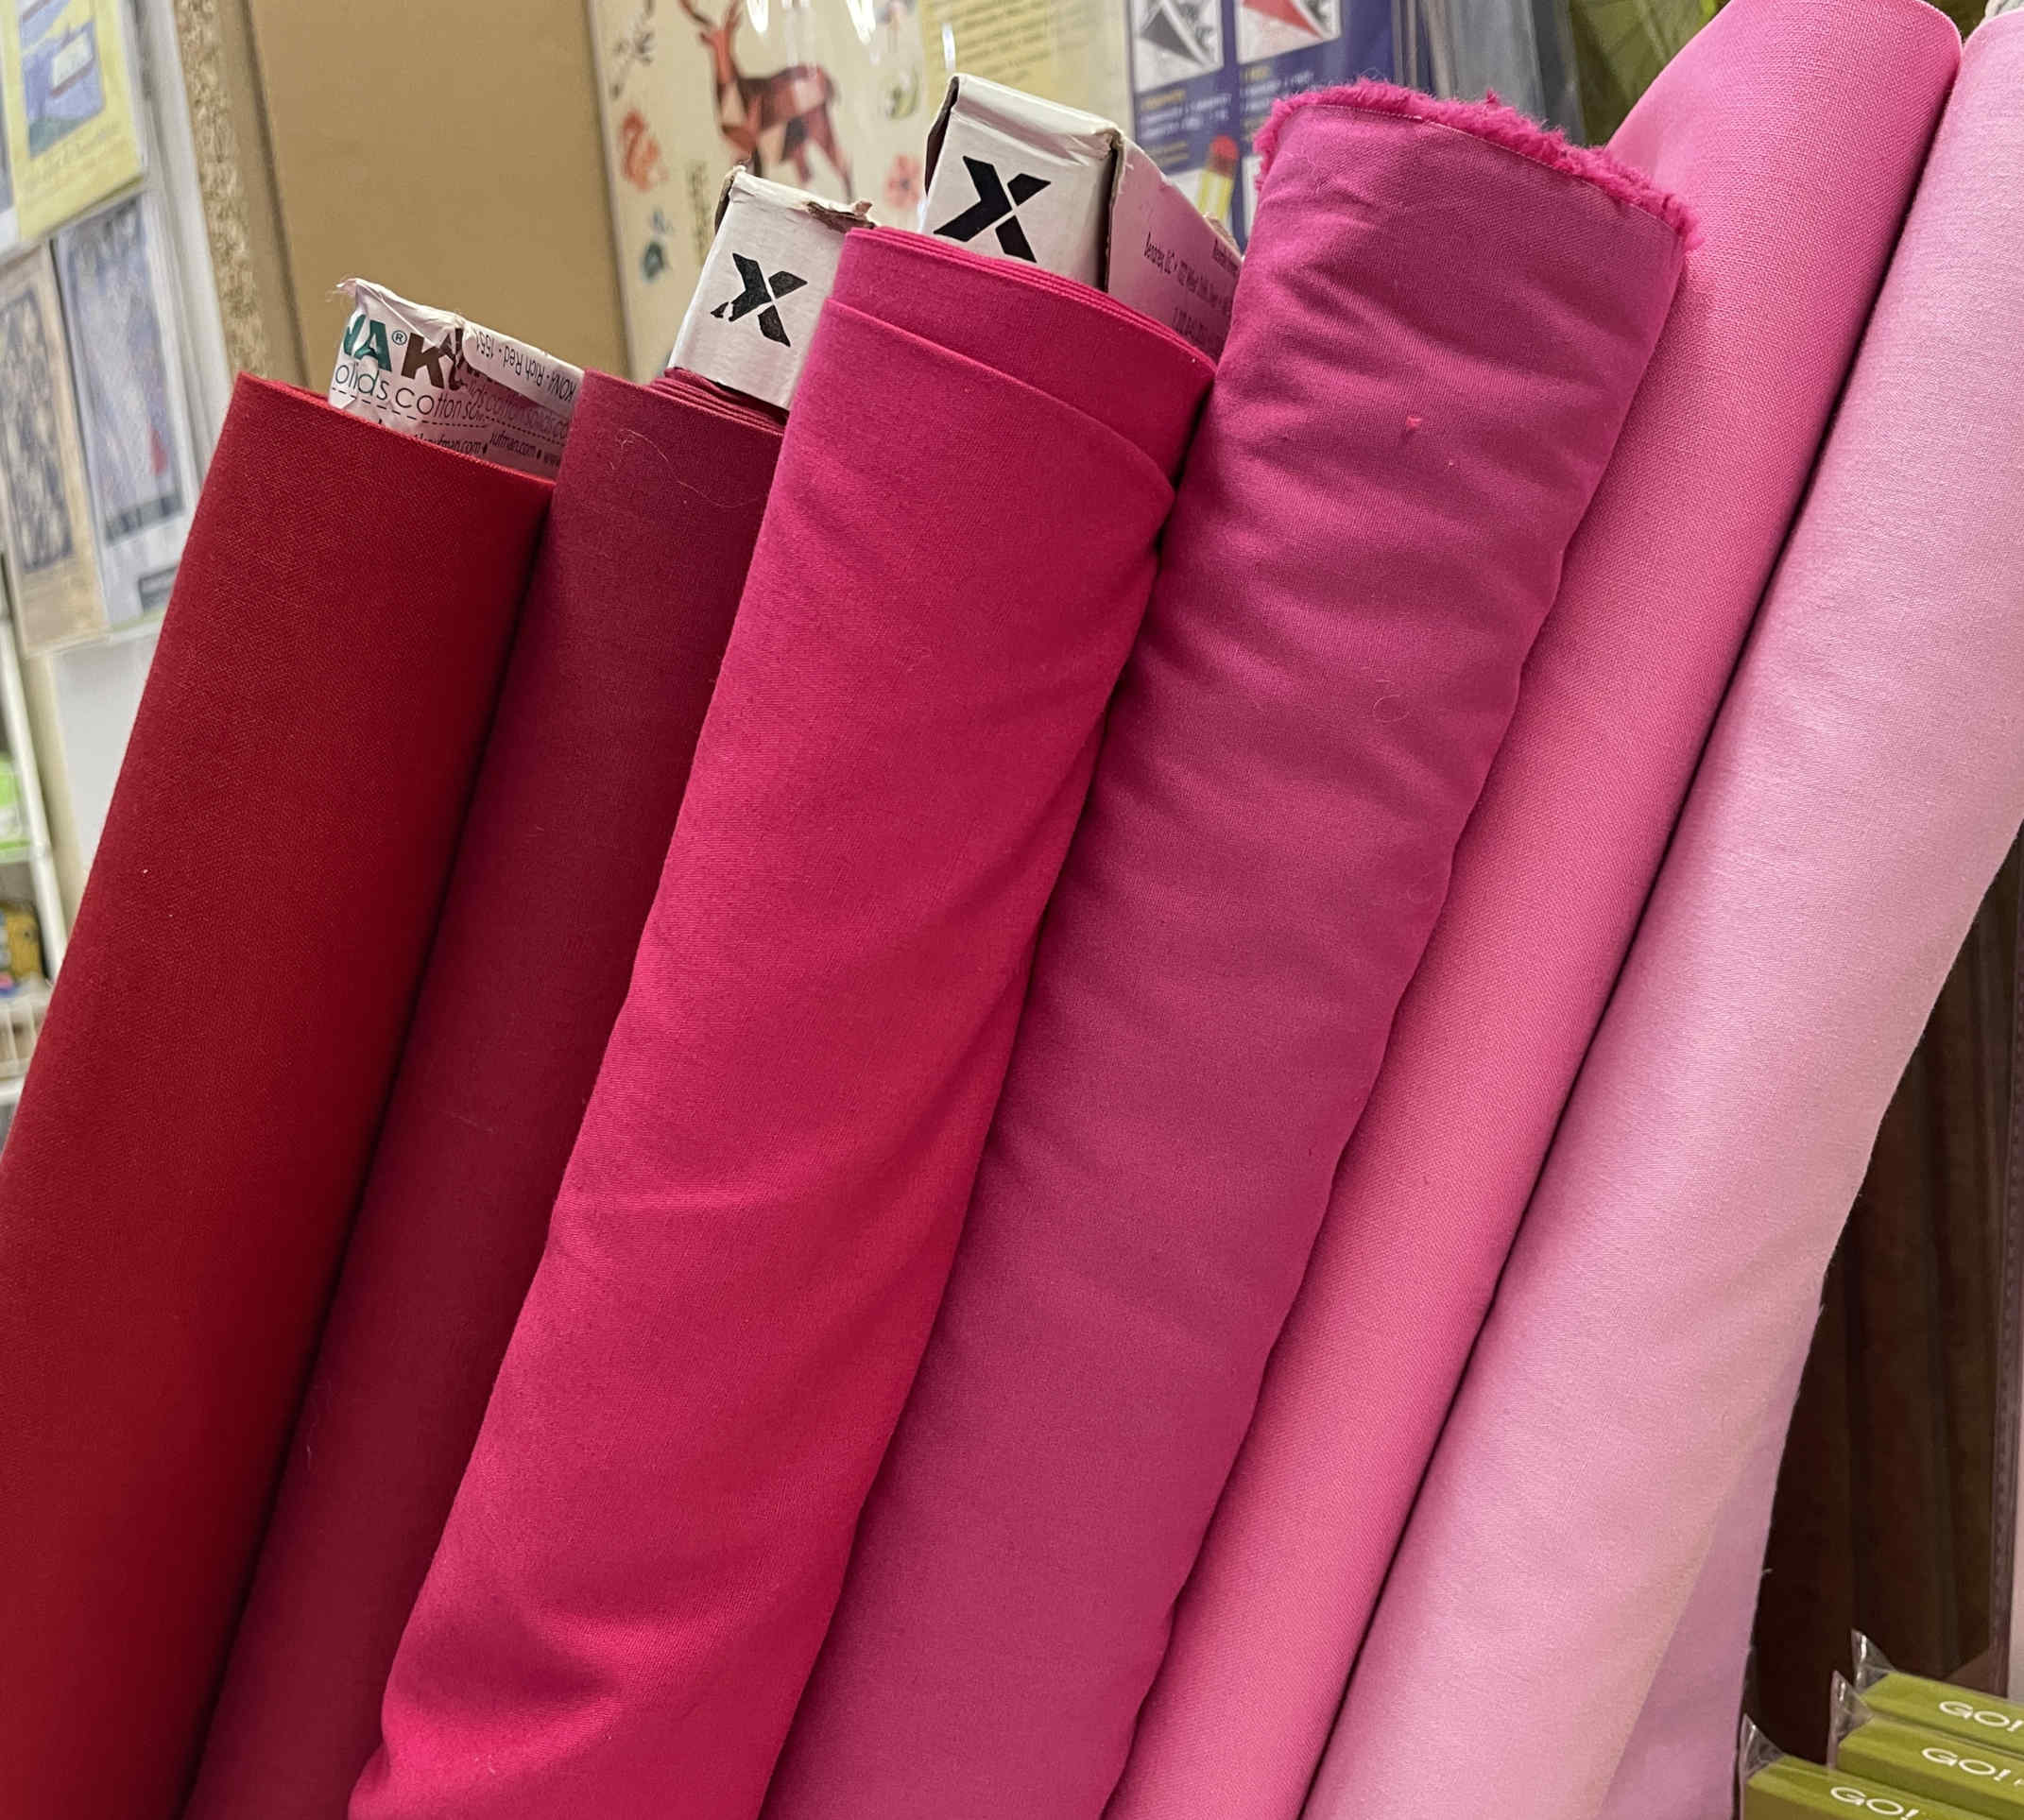
Worked off of that image to find the closest match at the fabric store
I want to explore a way to do this with more tech assistance. It was hard to do just by sight.
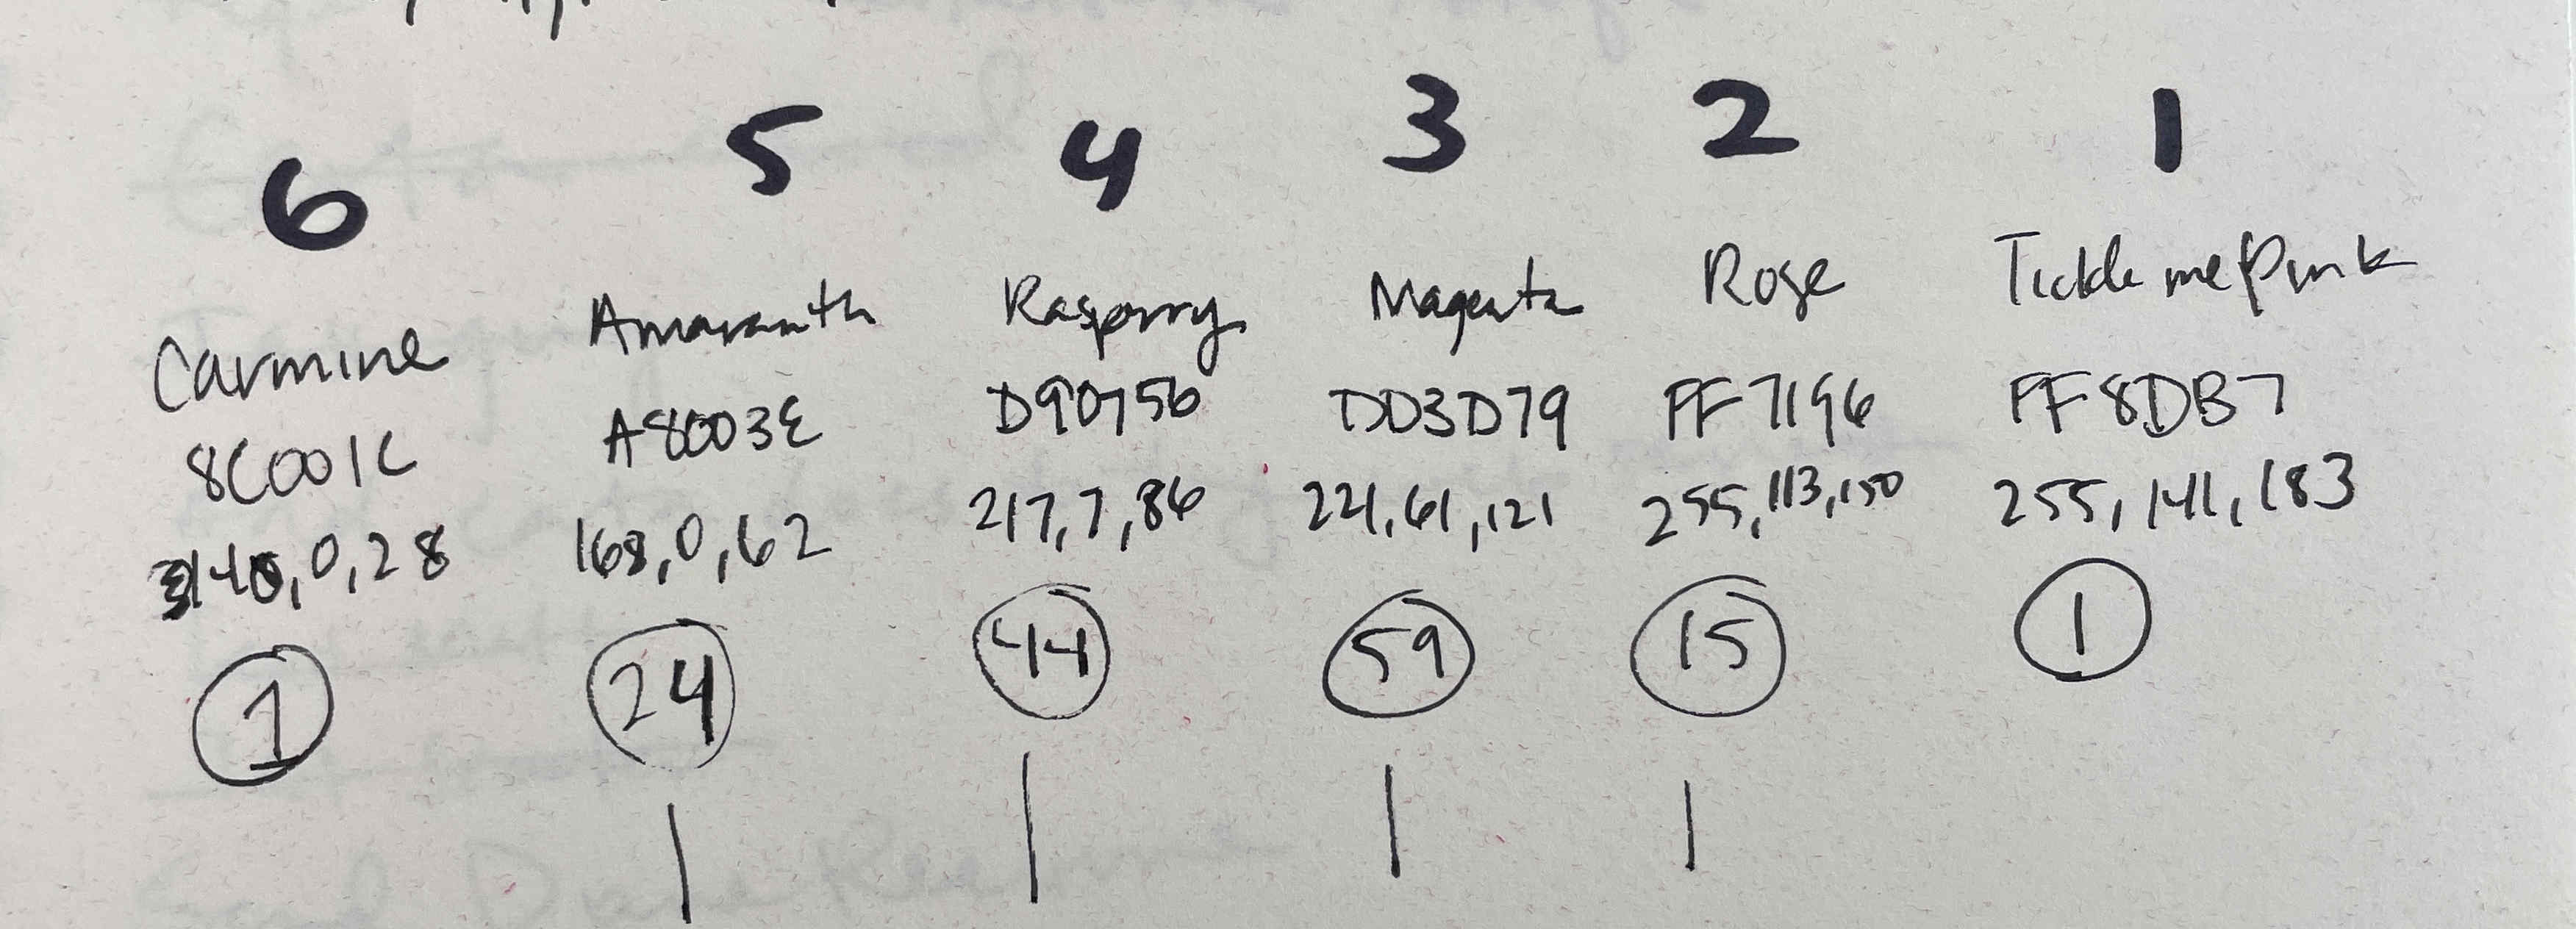
Handwrote my own cheat sheet to move between fabric name, hex code, RGB, and my own 1-6 numbering system.
I cut the fabric into 3.5" strips. Knowing that I could get 10 squares per strip, I cut as many strips of each color as I needed to exceed the amount.
Once the strips are cut, I measured 3.5" in the other direction to cut the strips into squares.
I found this to be very meditative.
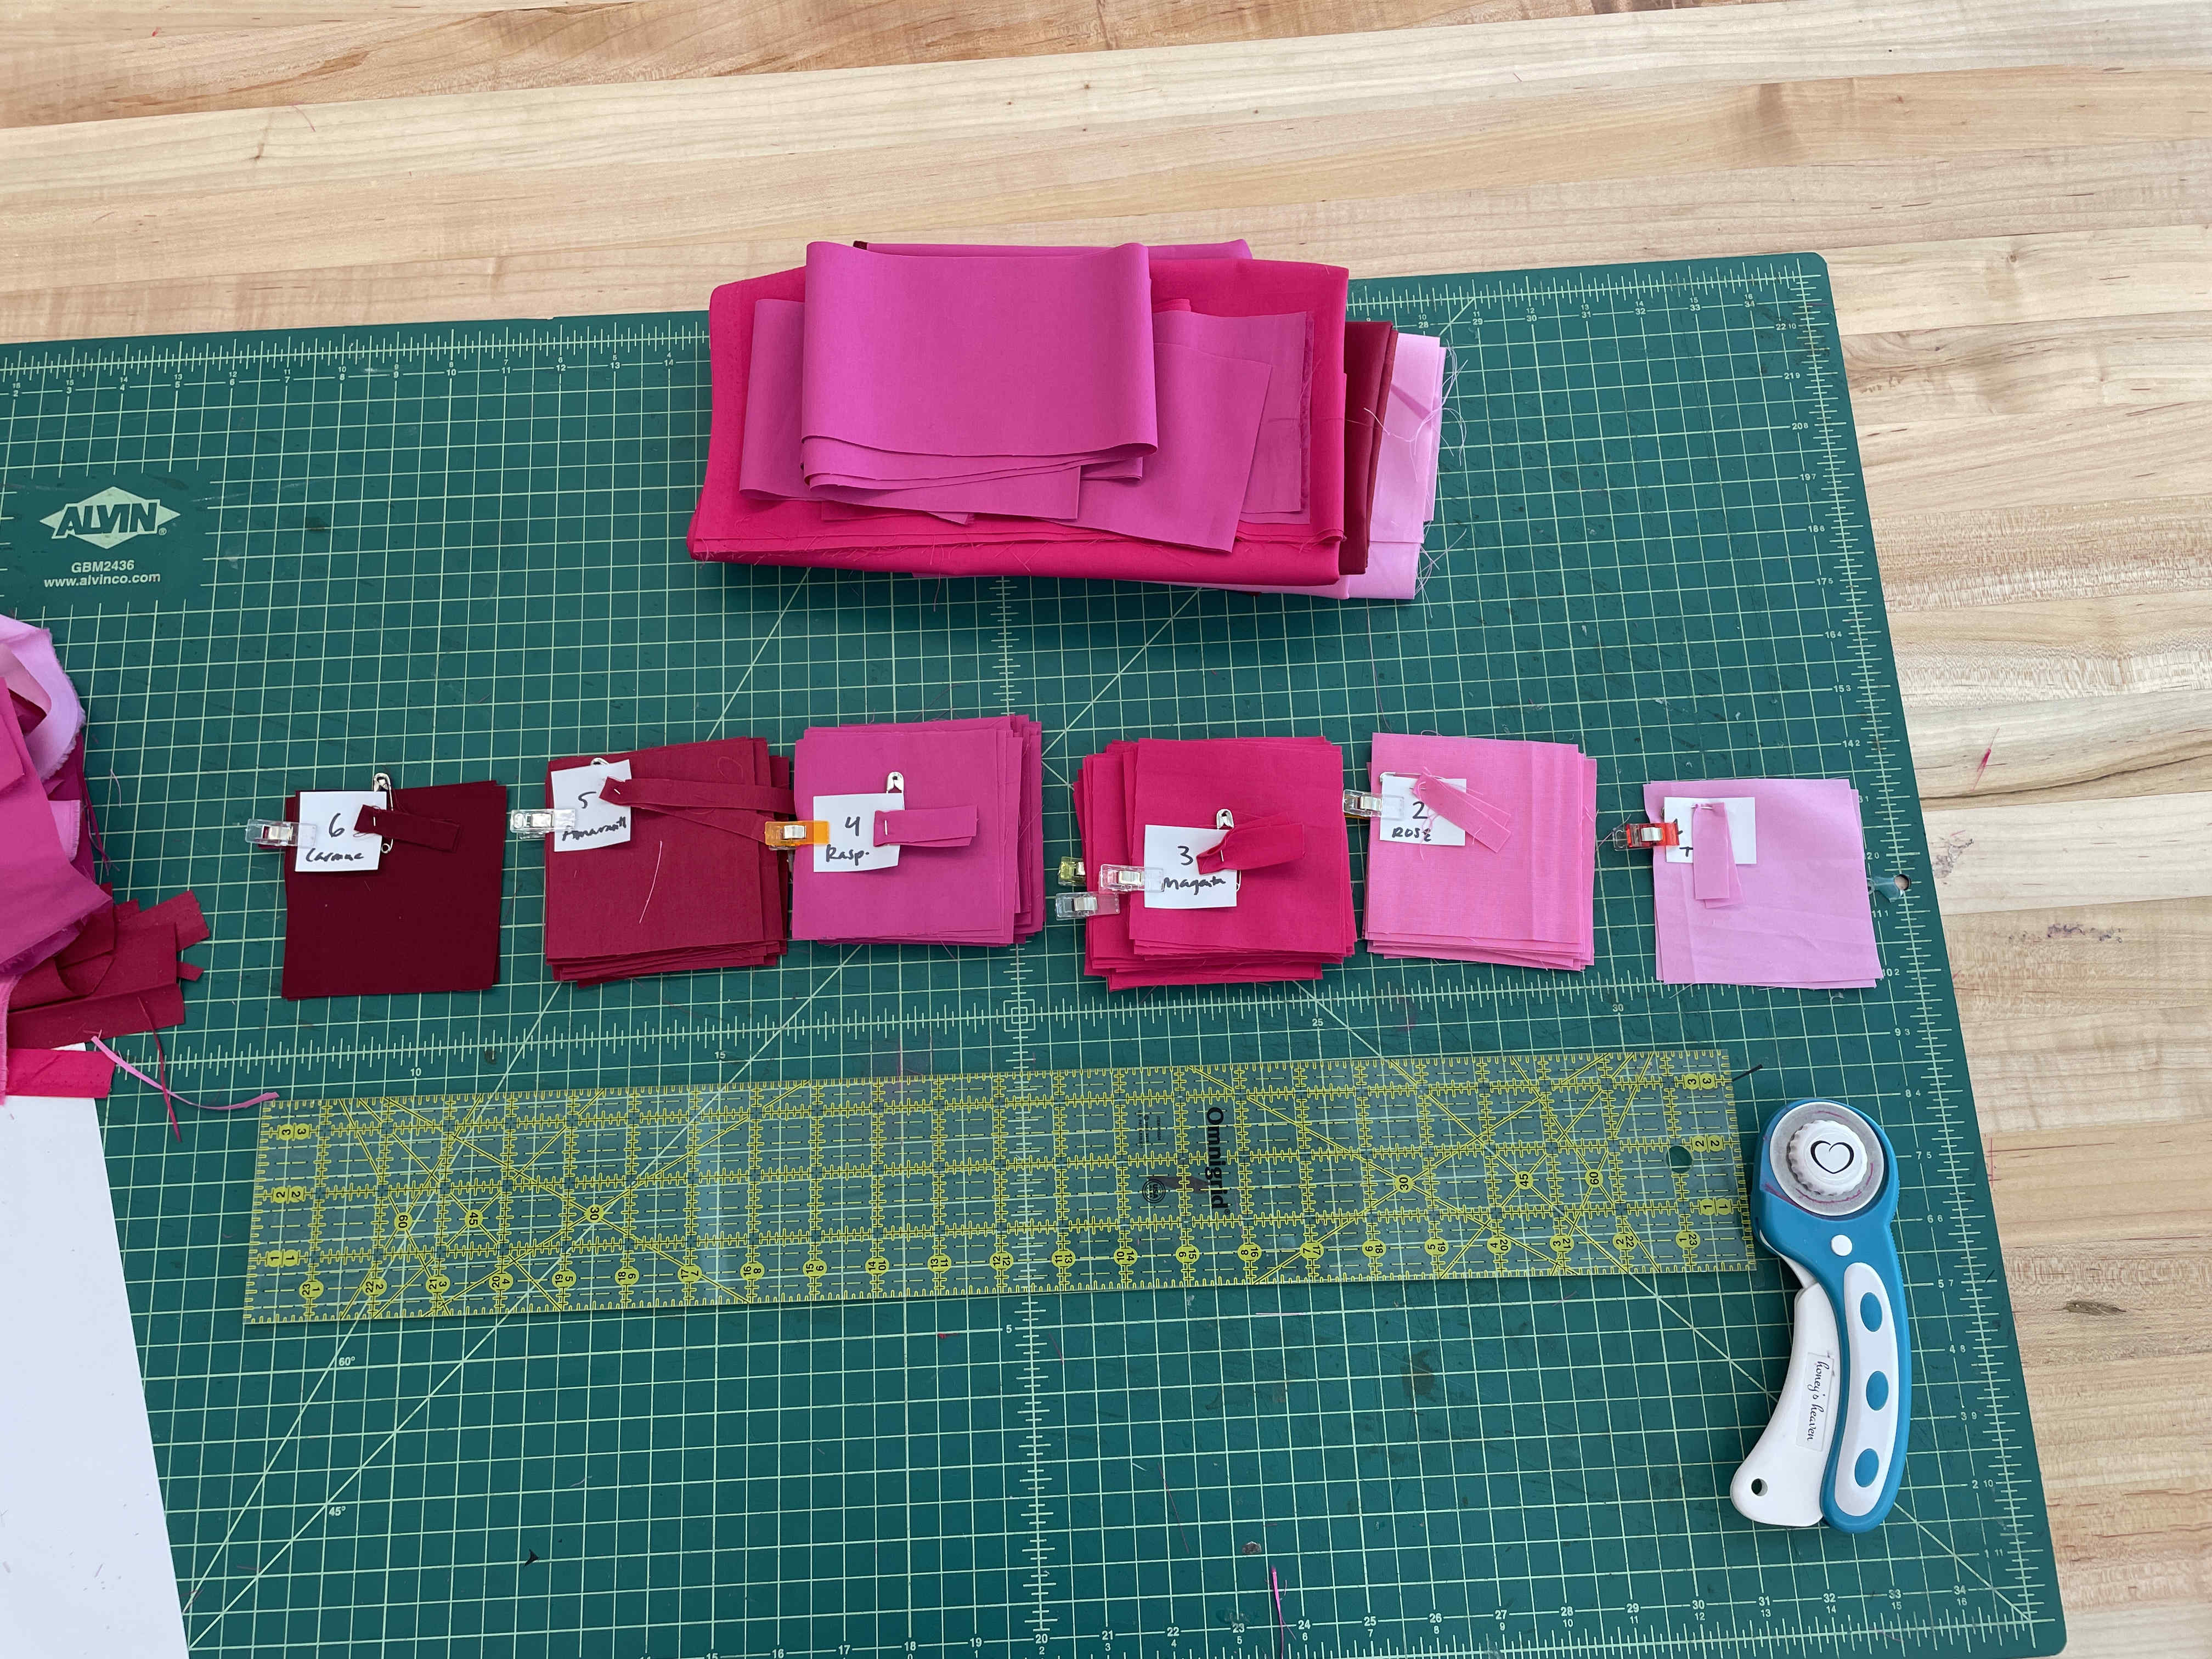
All 144 squares were cut, so I was ready to arrange the pattern.
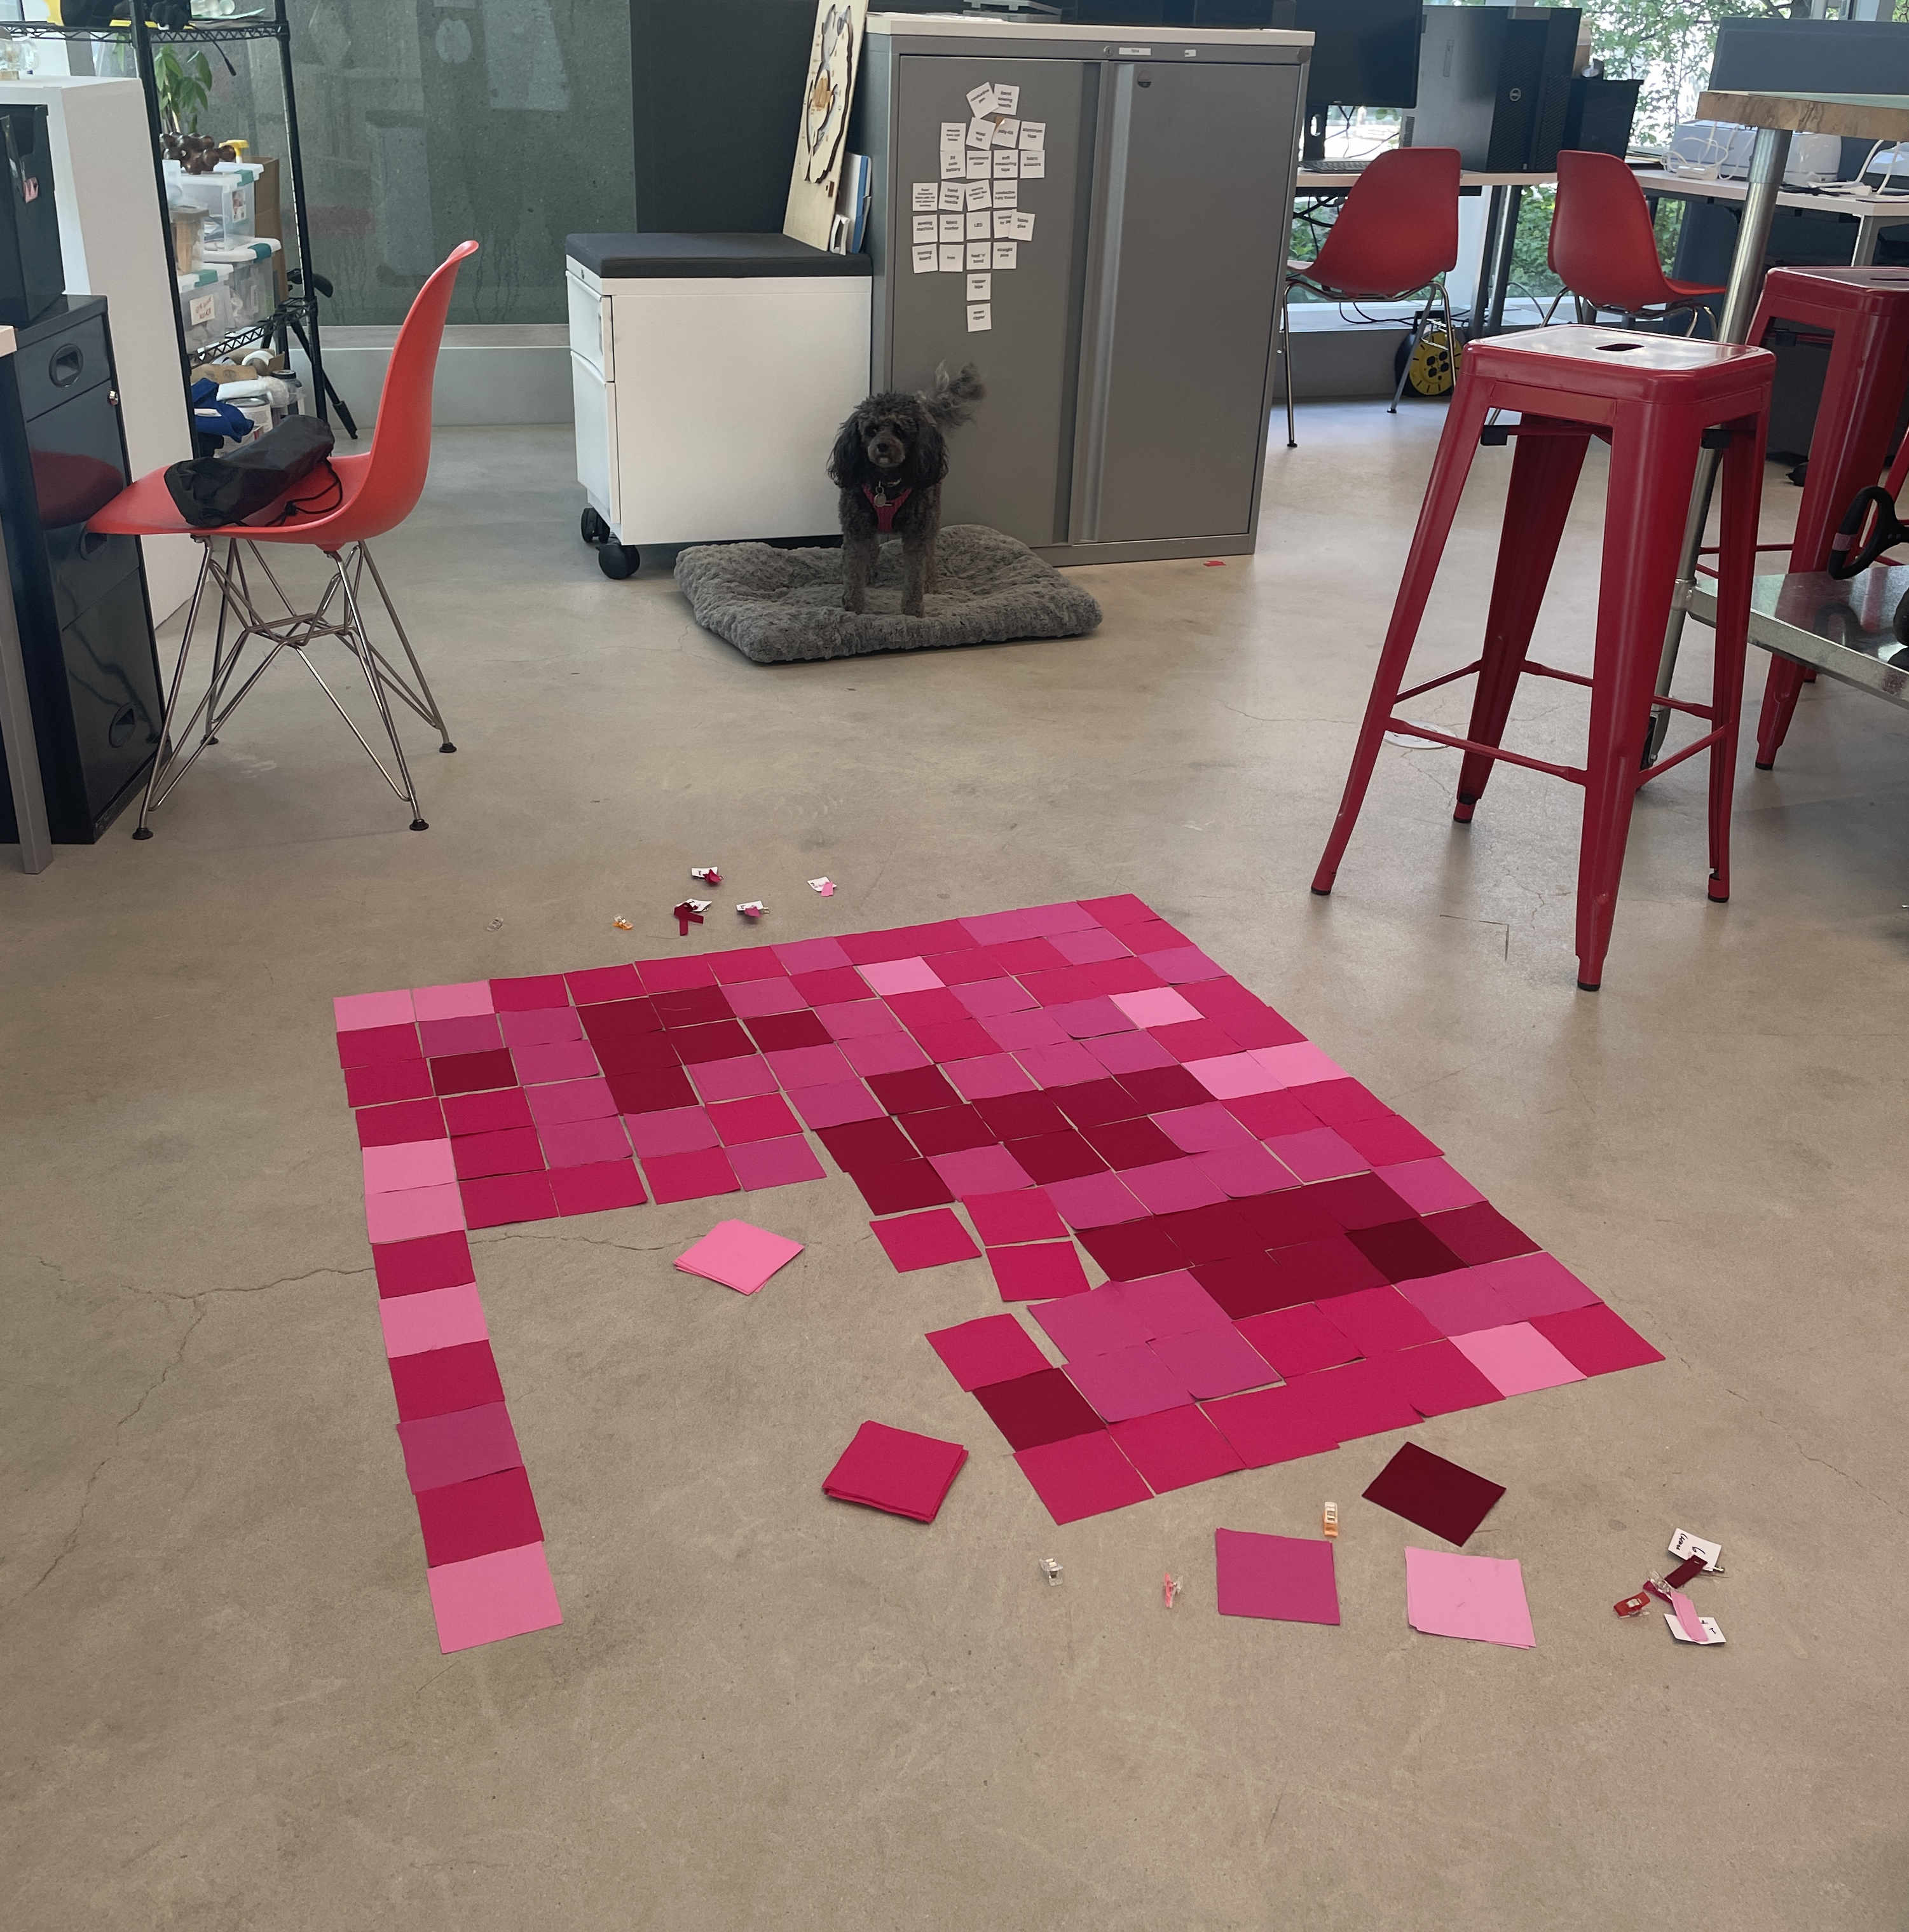
Using my photo as a guide, I laid out the squares in the correct positions.
Then I stacked each column into a pile. Each pile started with the top square and worked downwards in sequence. I labeled each of these columns with a spare piece of paper to track their location in space.
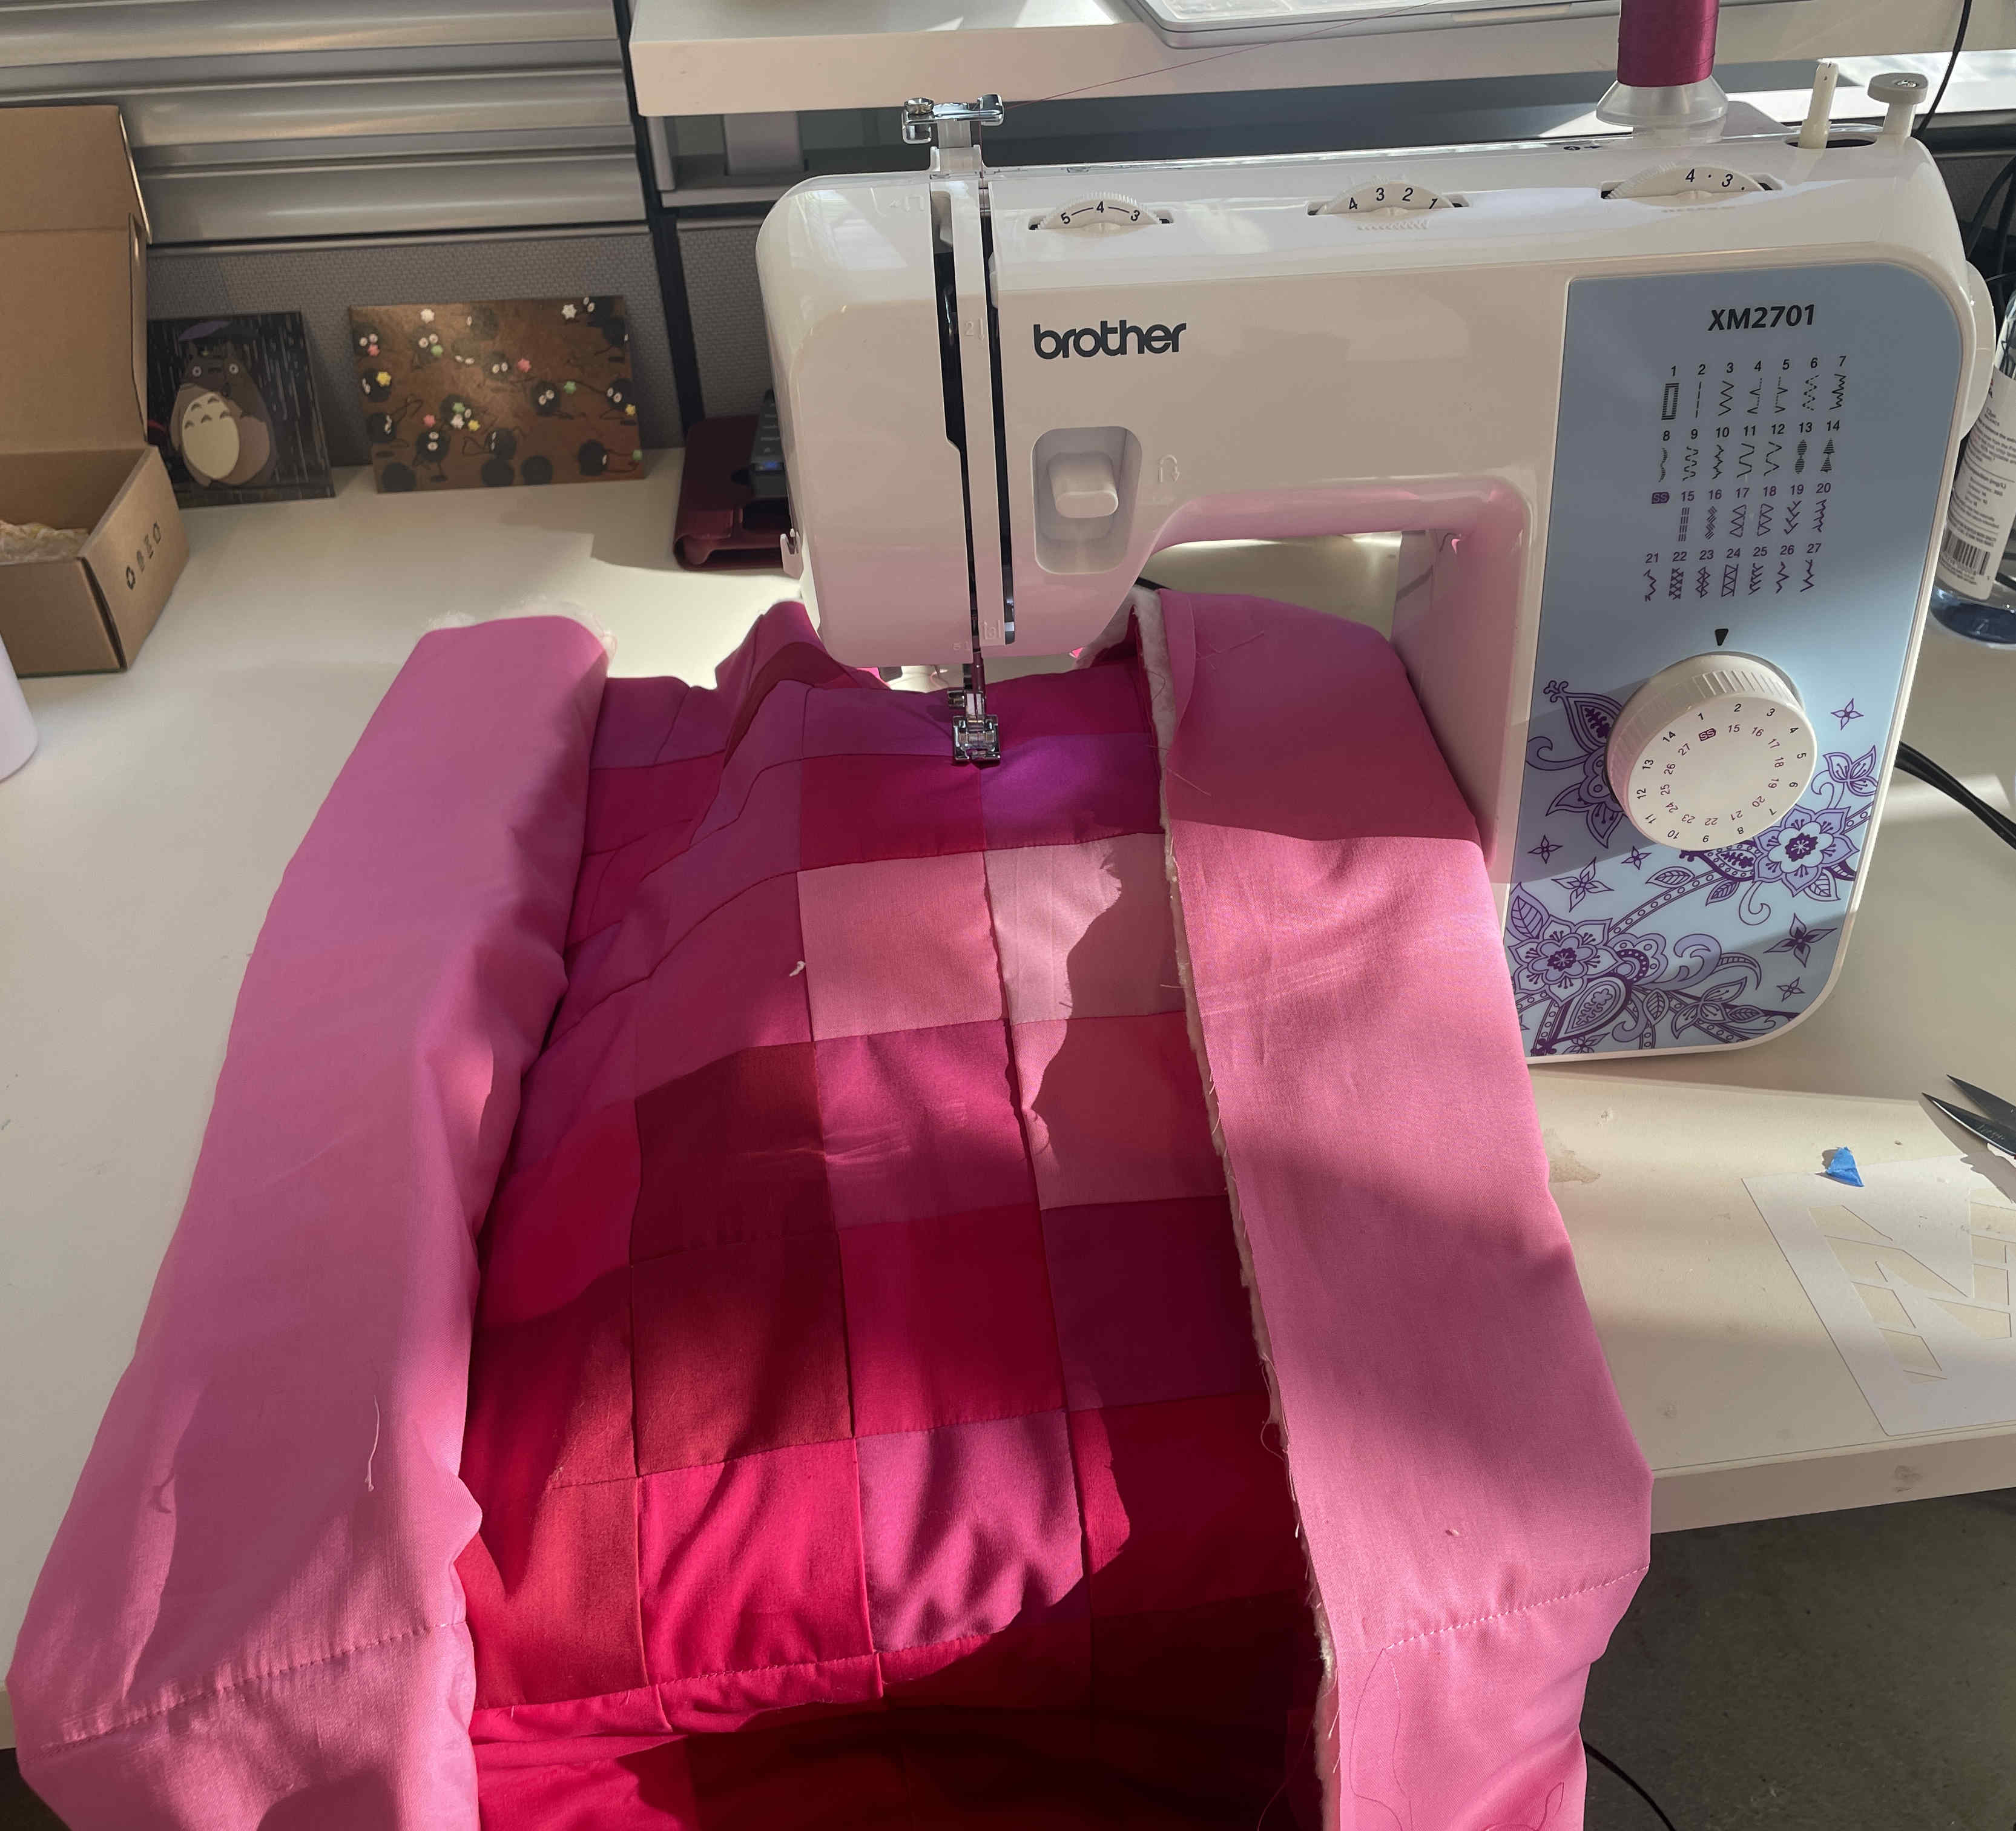
I used the chain piecing method to join these squares. The squares were sewn together in their column first, but the sewing was worked horizontally, so that each row was chain pieced together before it was sewn.
Using this method, I created 9 4x4 blocks.

What I love about chain piecing is that it makes it much easier to join the columns together. I was able to very perfectly align many of the squares.
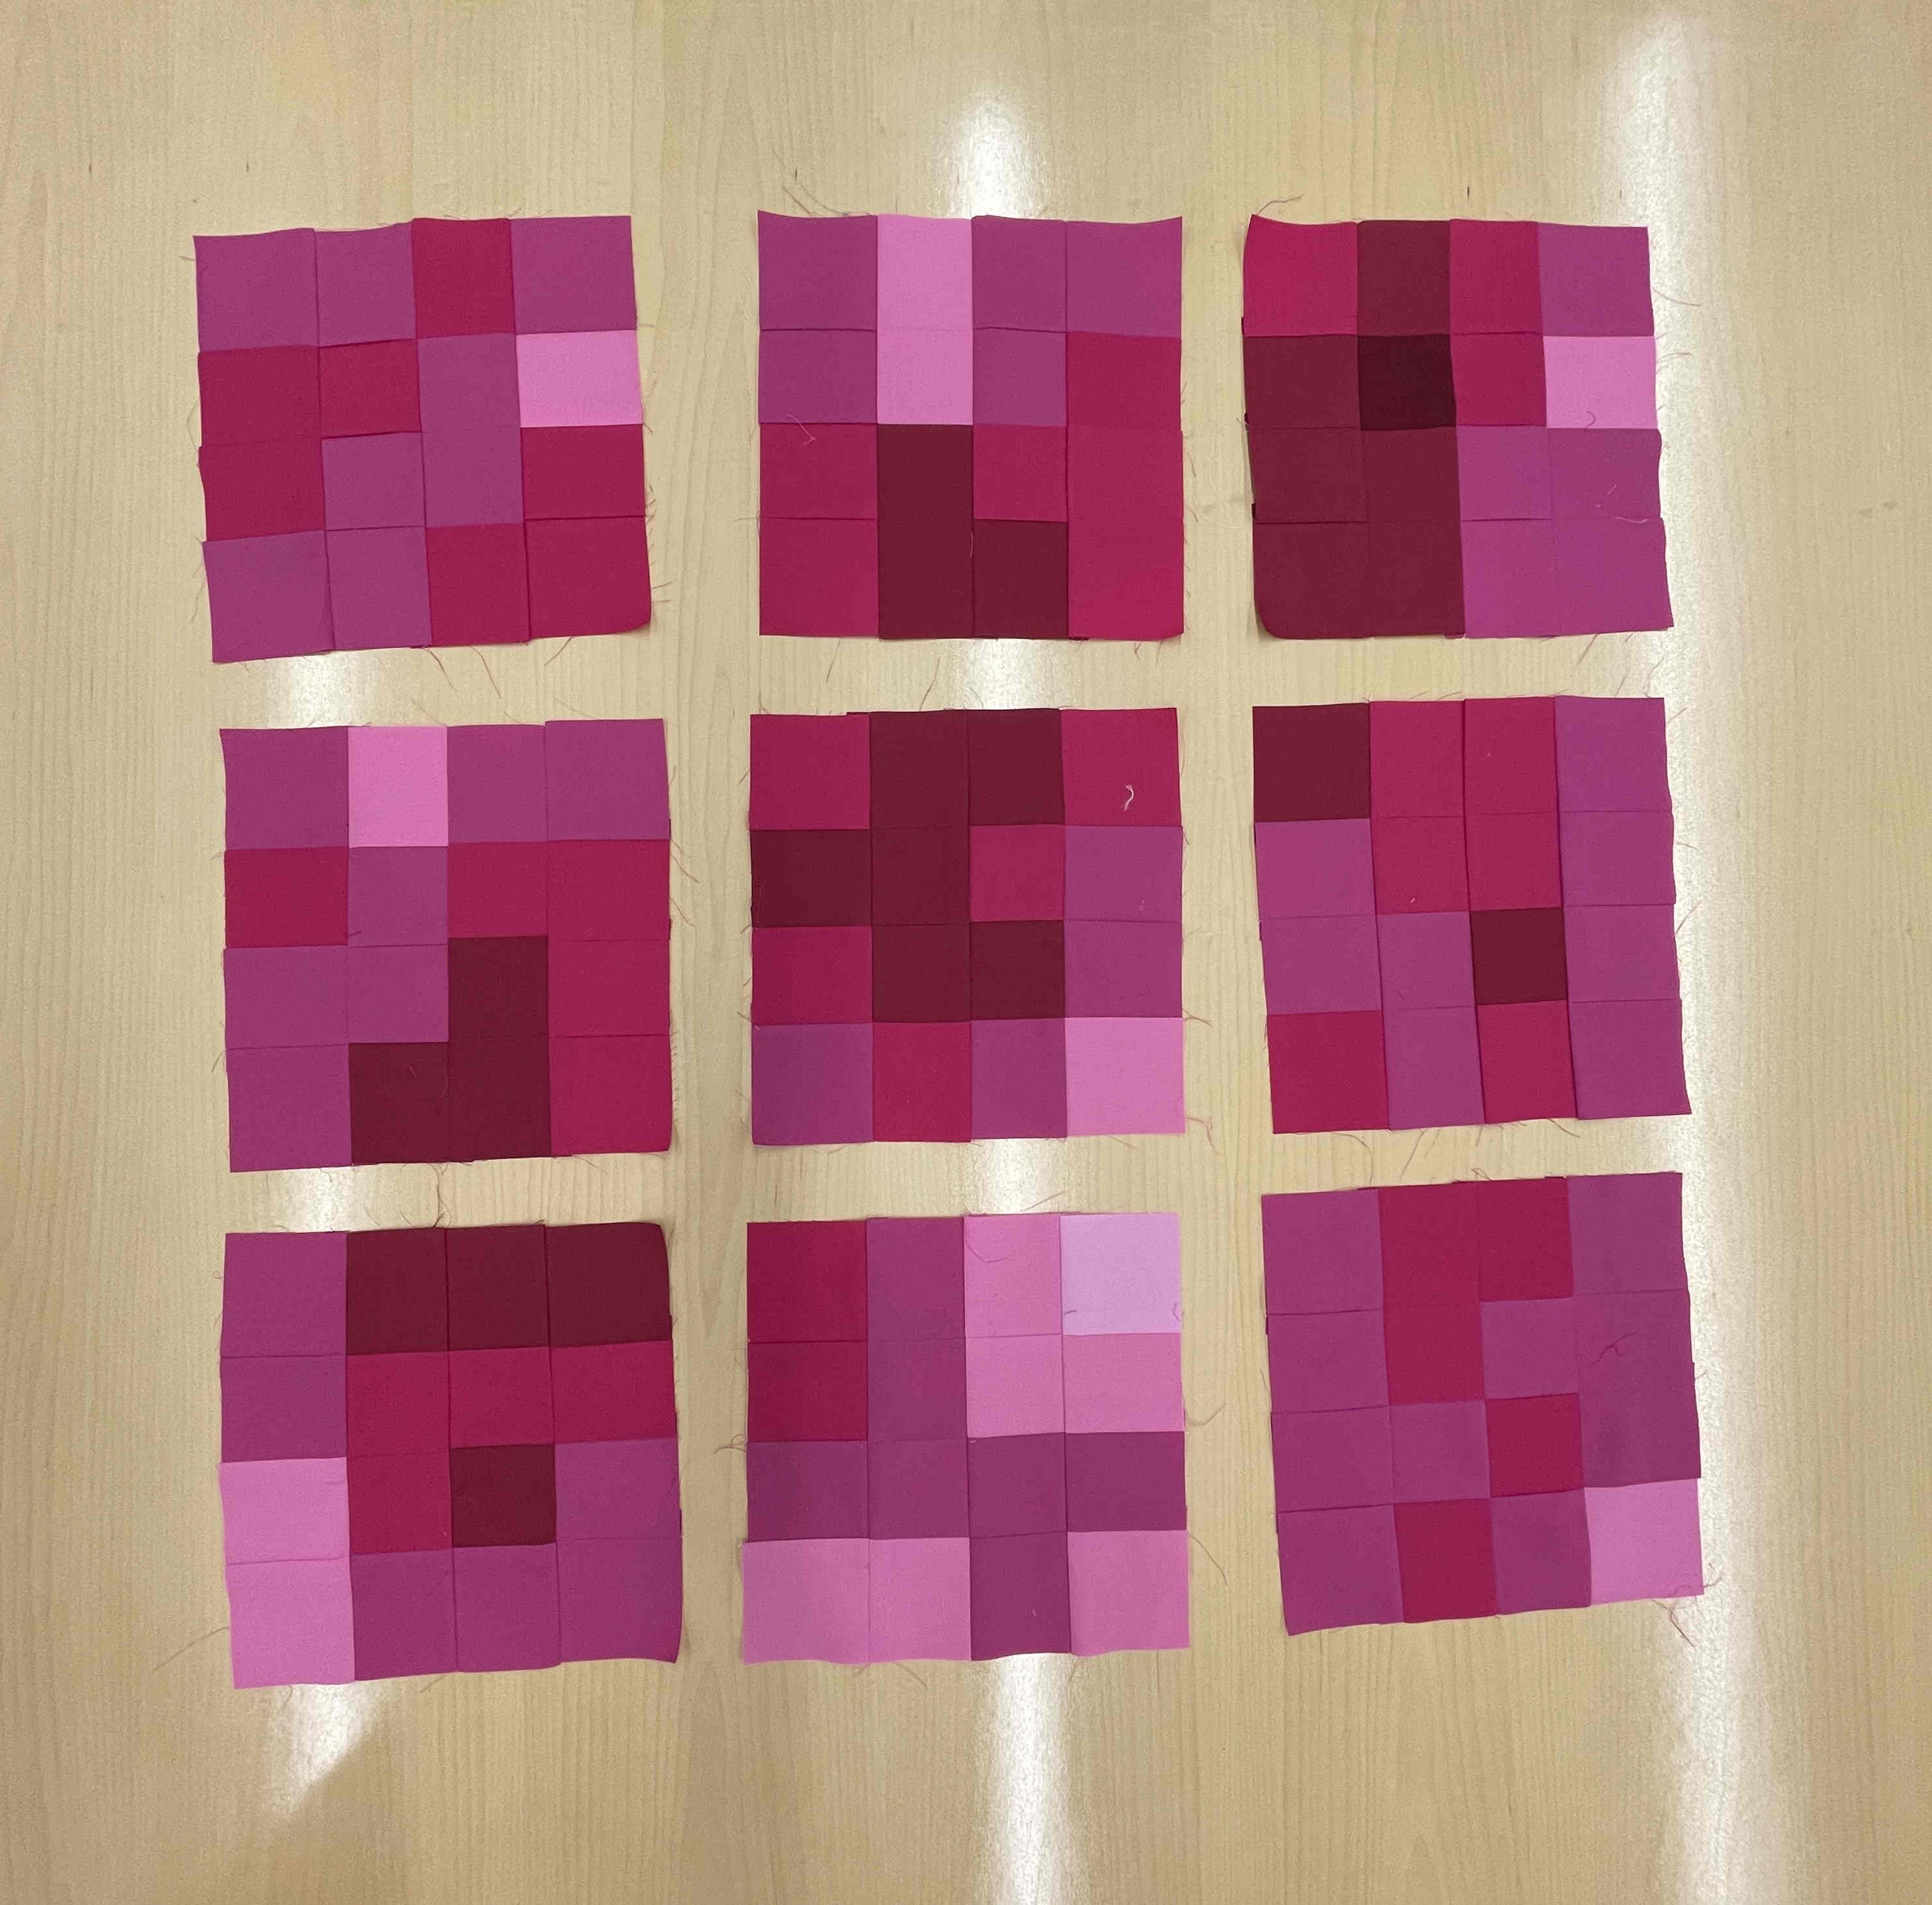
Once those blocks were complete, I only had to join the remaining 9 squares to finish the quilt. There is also a math quilt idea in here--instead of trying to handle each square individually (144), I handled 16 at a time, which left me with a simplified 9 squares to deal with at the end.
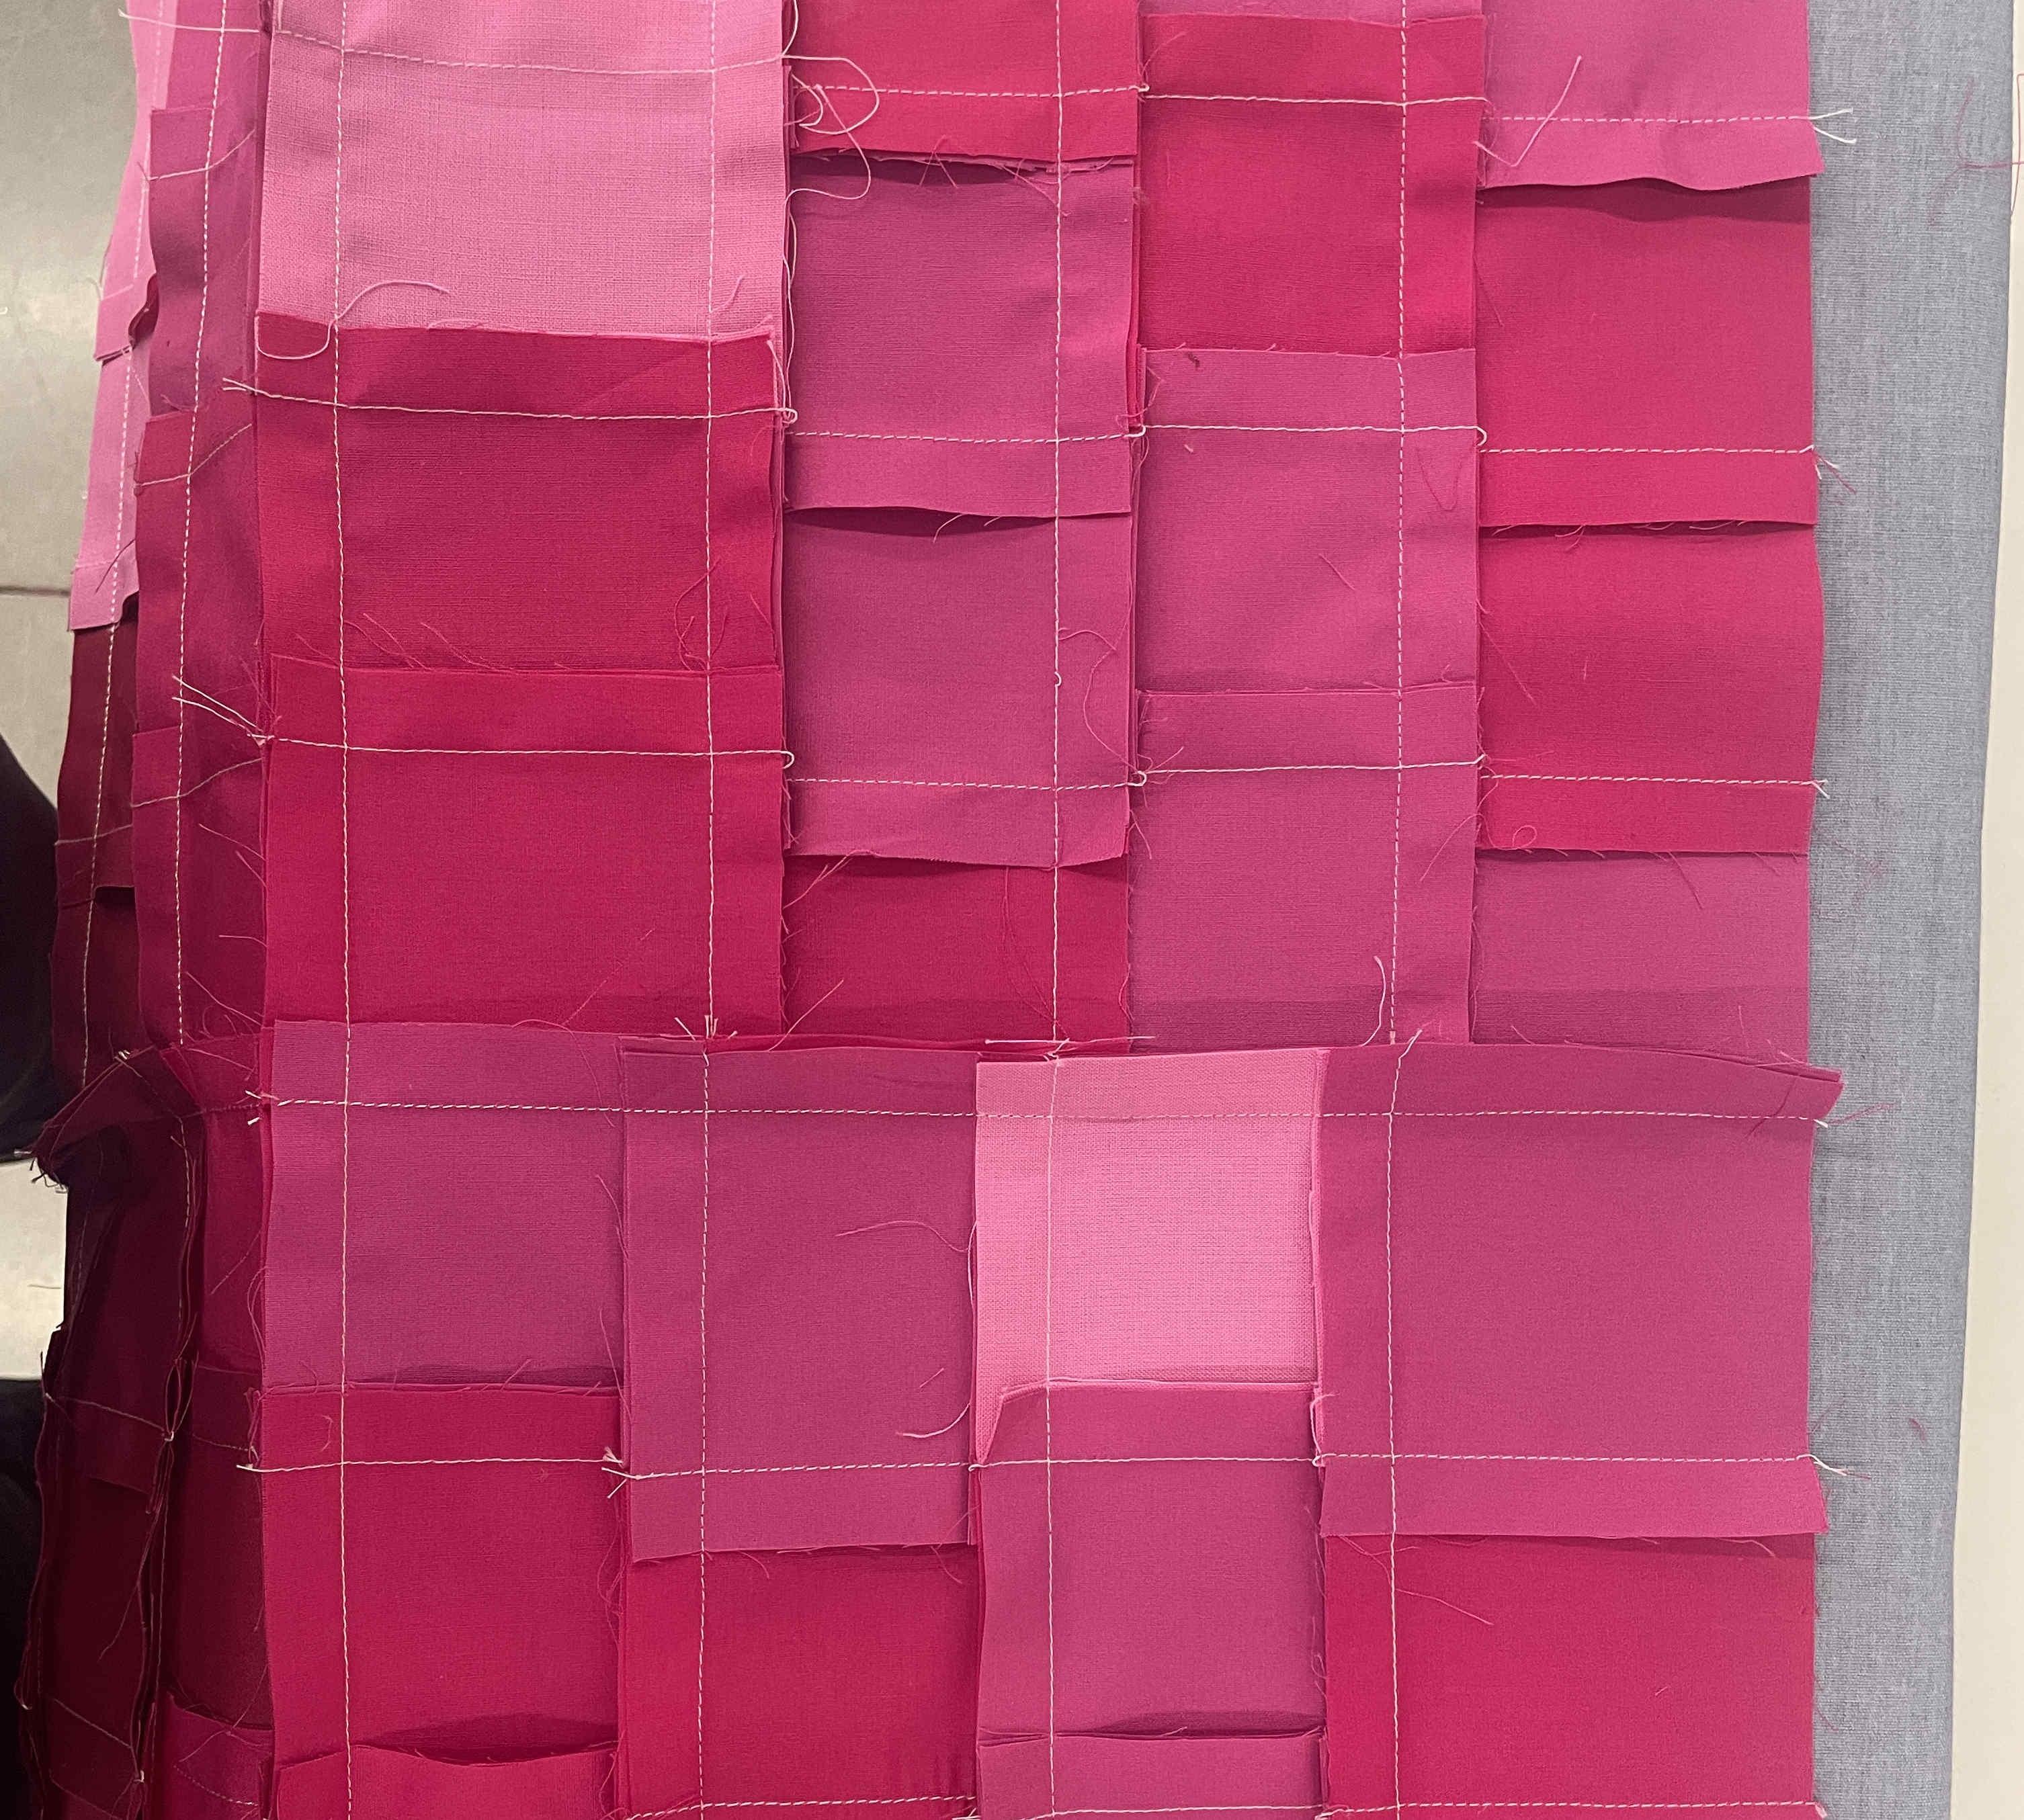
This is what the back side looks like.
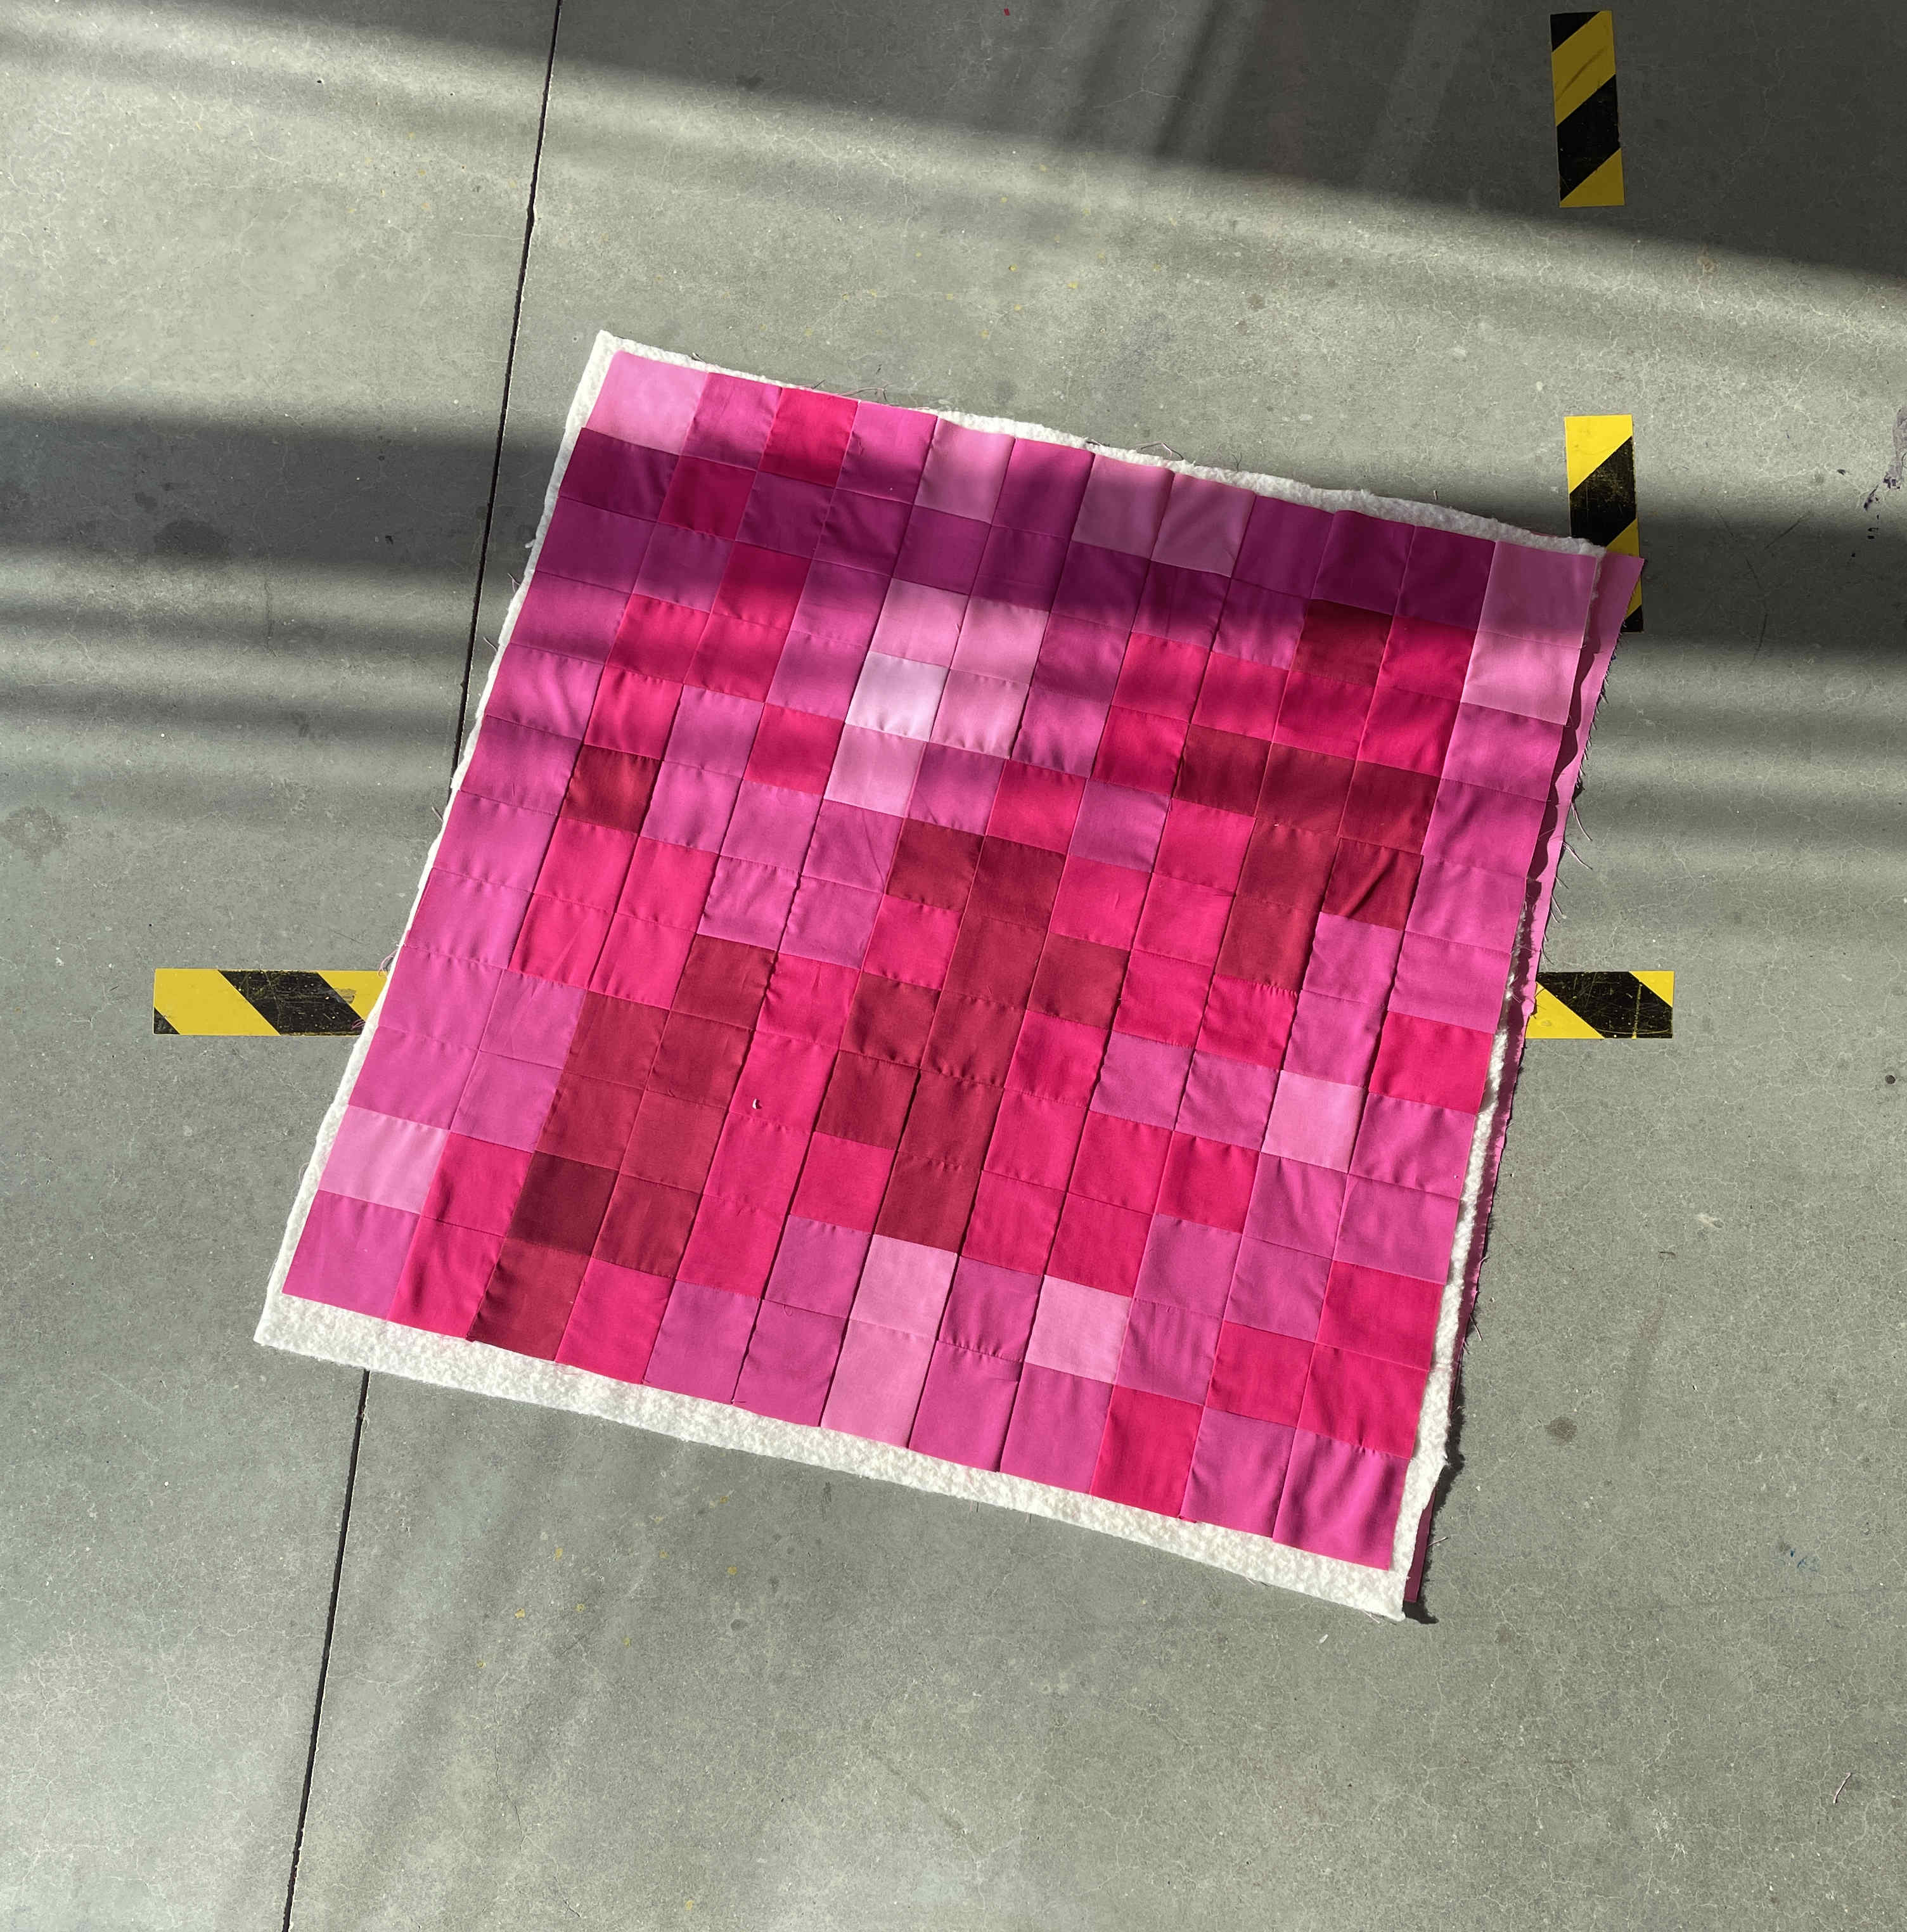
With the quilt top finished, I cut out the batting and lining to size.
I didn't add any extra design to the quilting, choosing instead to stitch-in-the-ditch along the 3x3 grid.
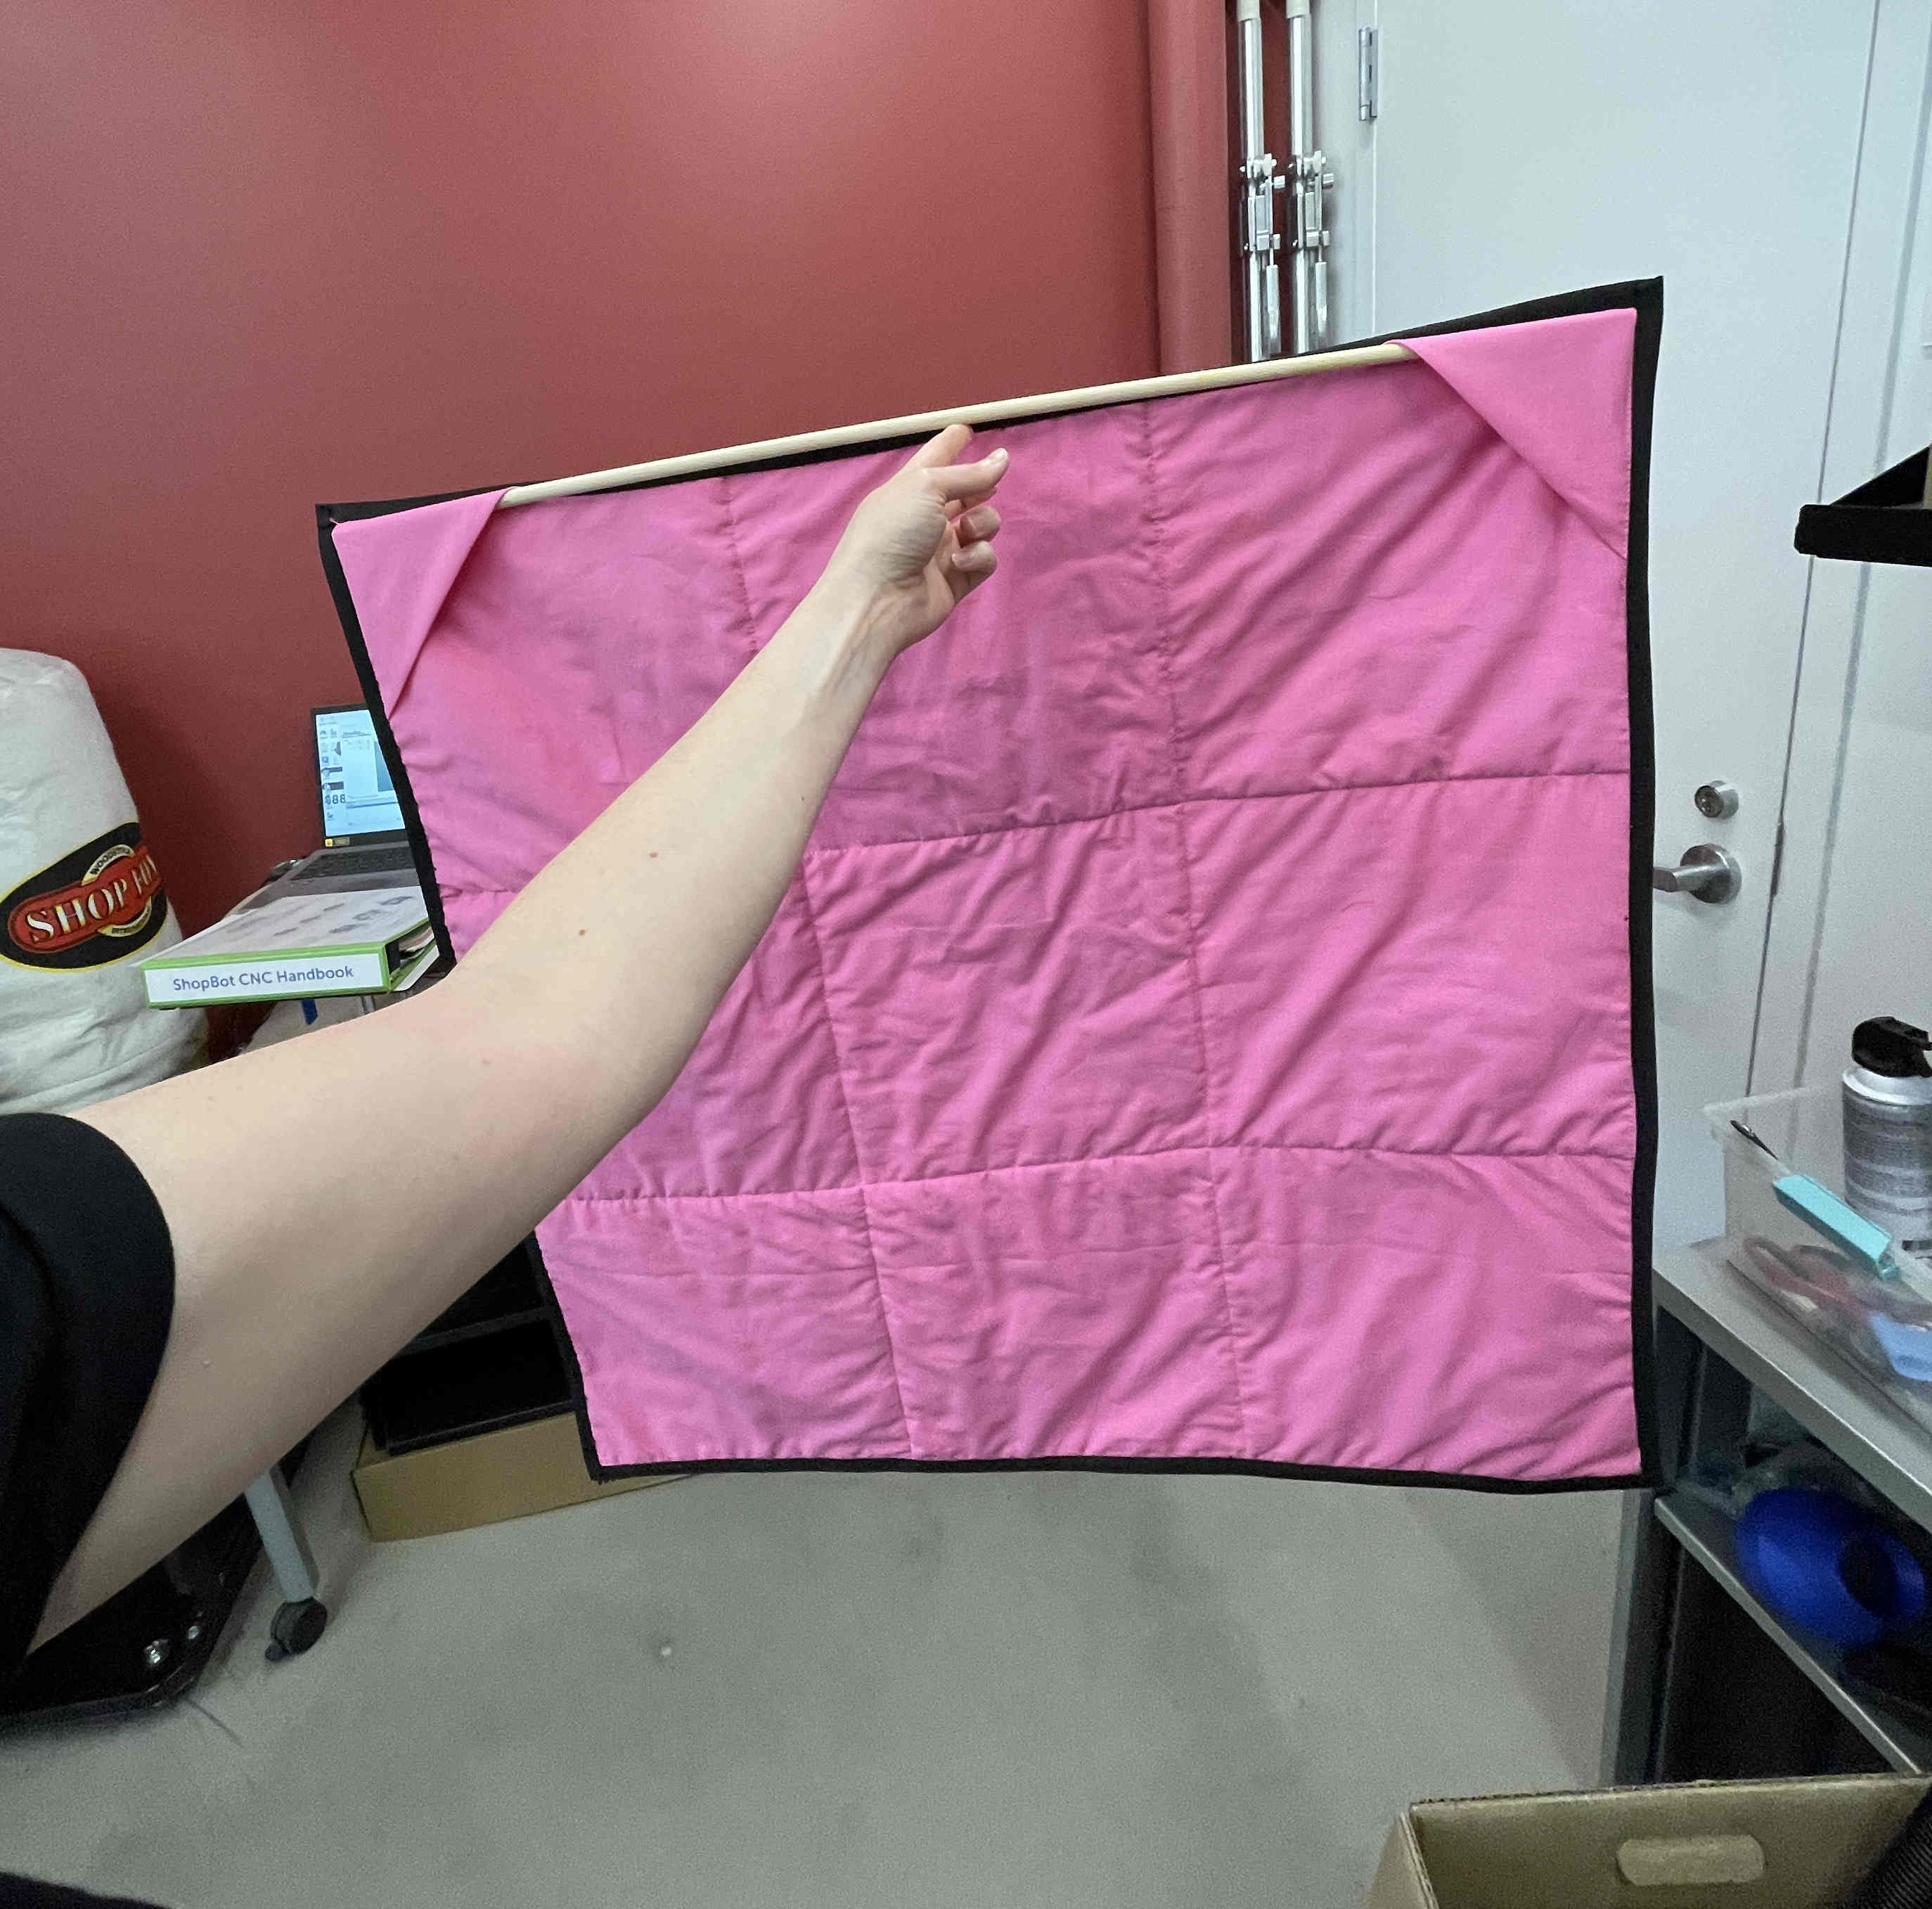
I made two envelopes across the back. We found a dowel rod when moving furniture in the old maker lab, and I cut it to the size of the quilt. It provides some structure while the quilt is hanging

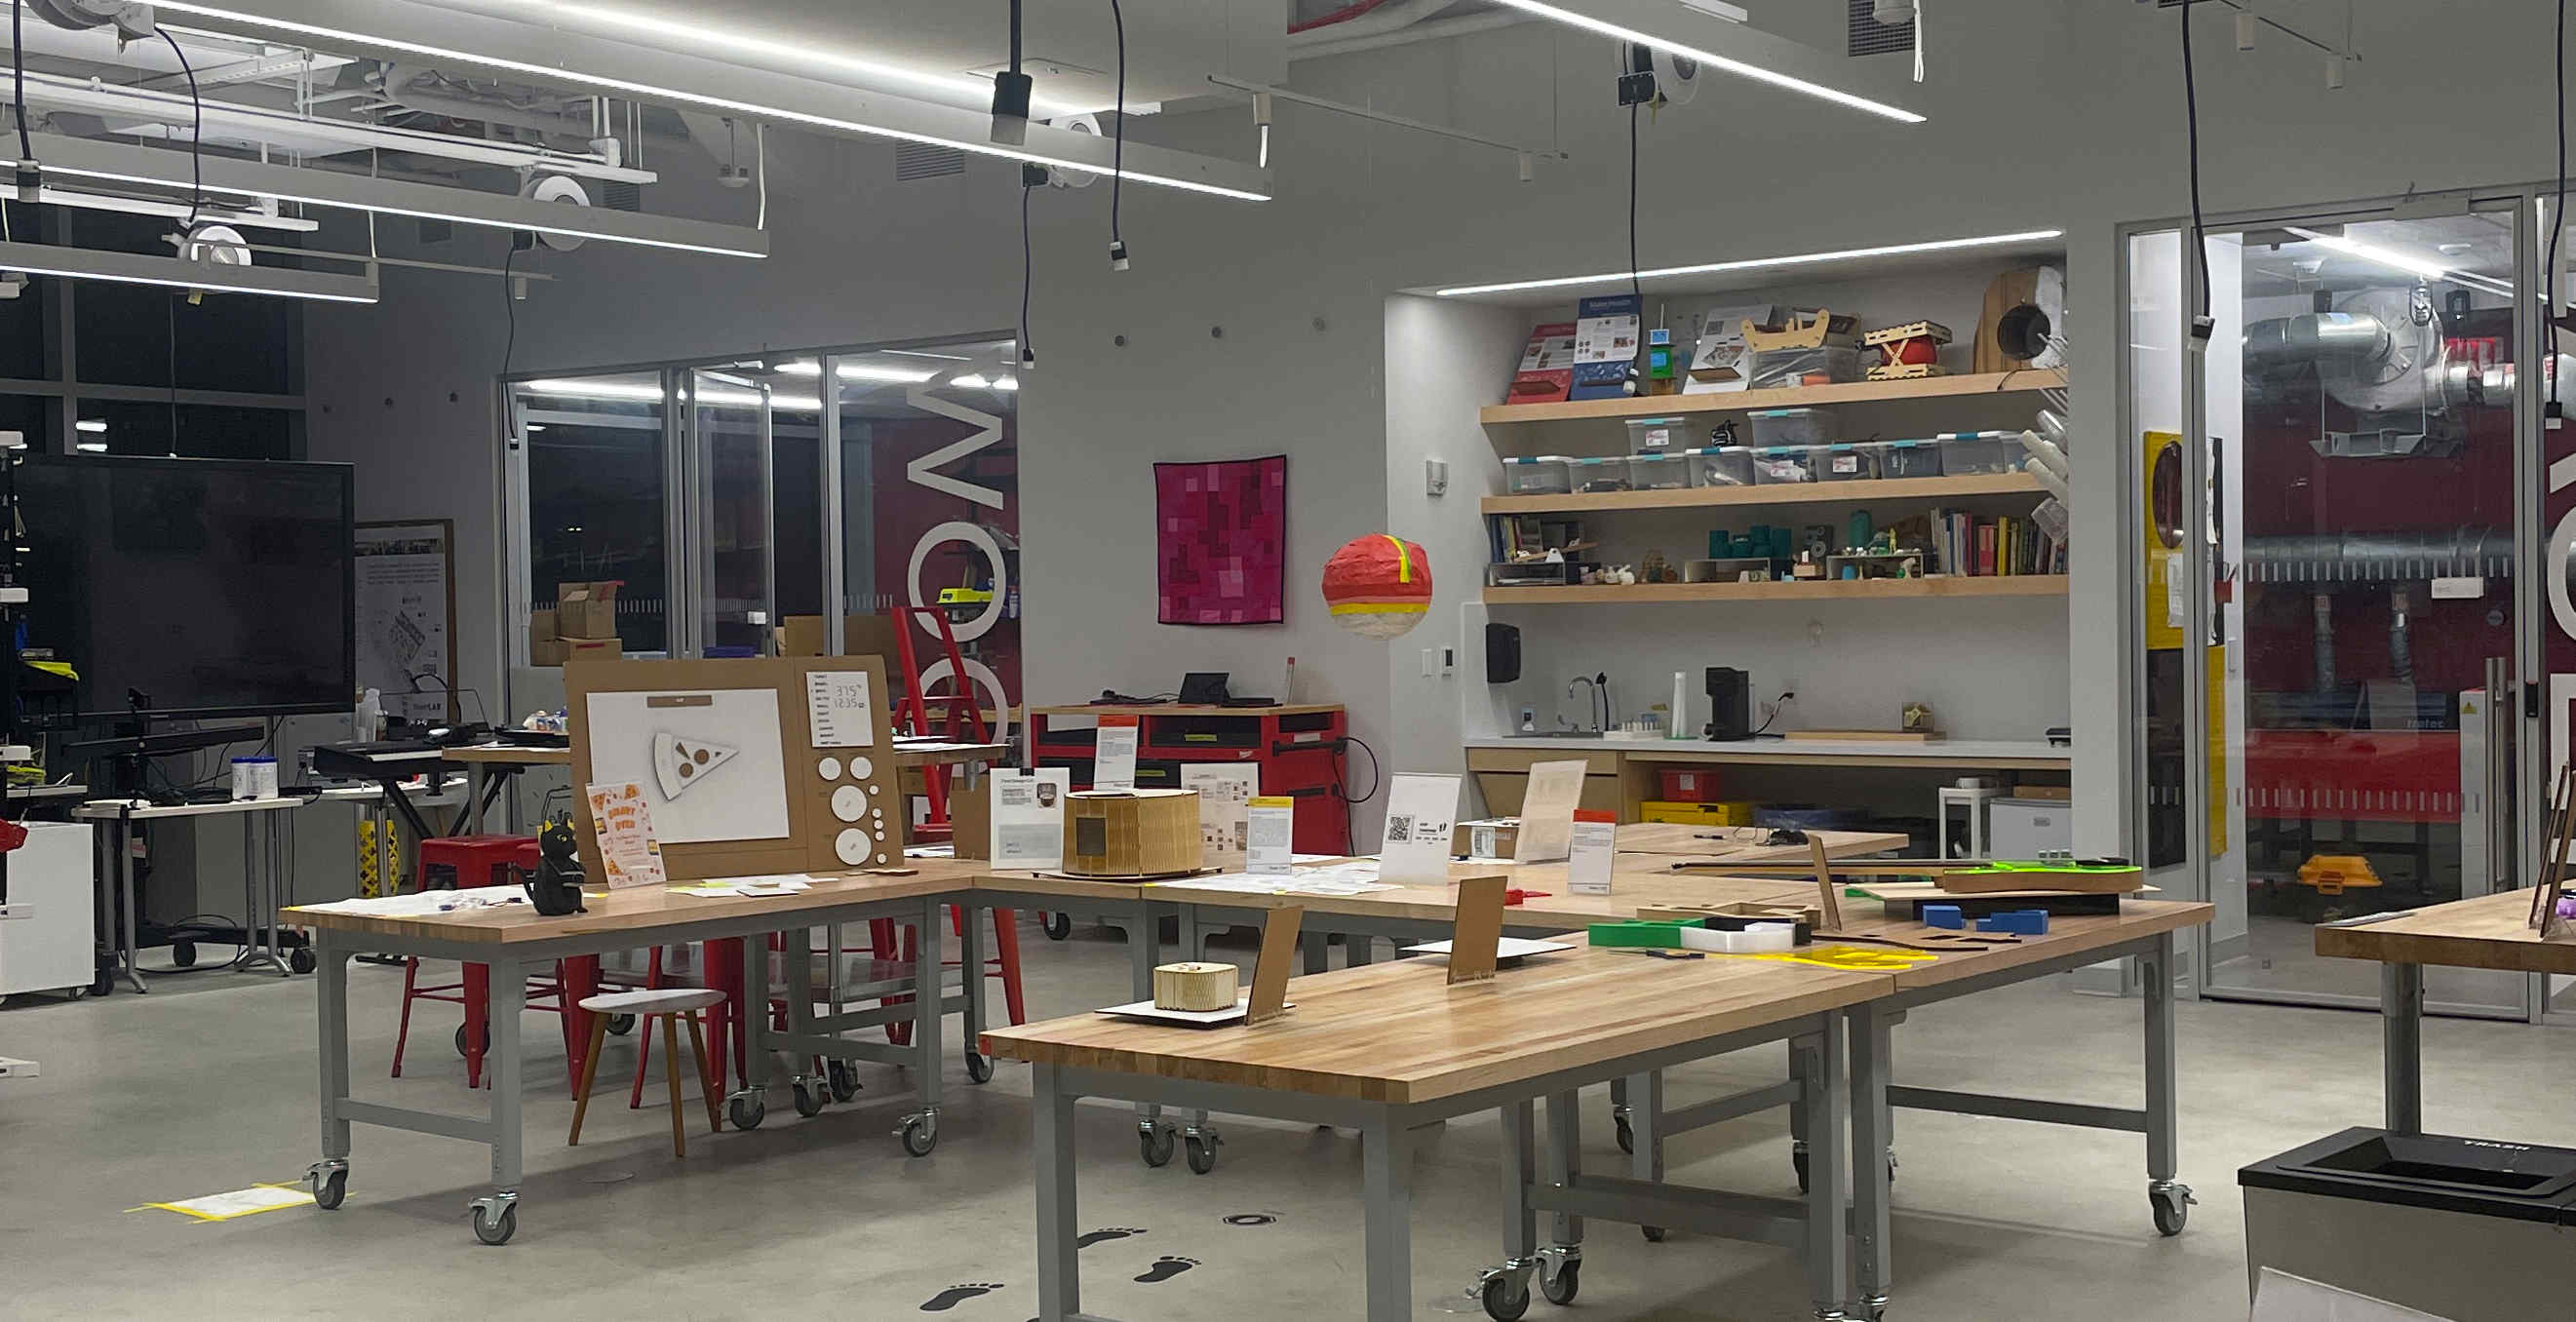
Below the quilt display I added demo pieces so that viewers could learn about the process and physically interact with the art.
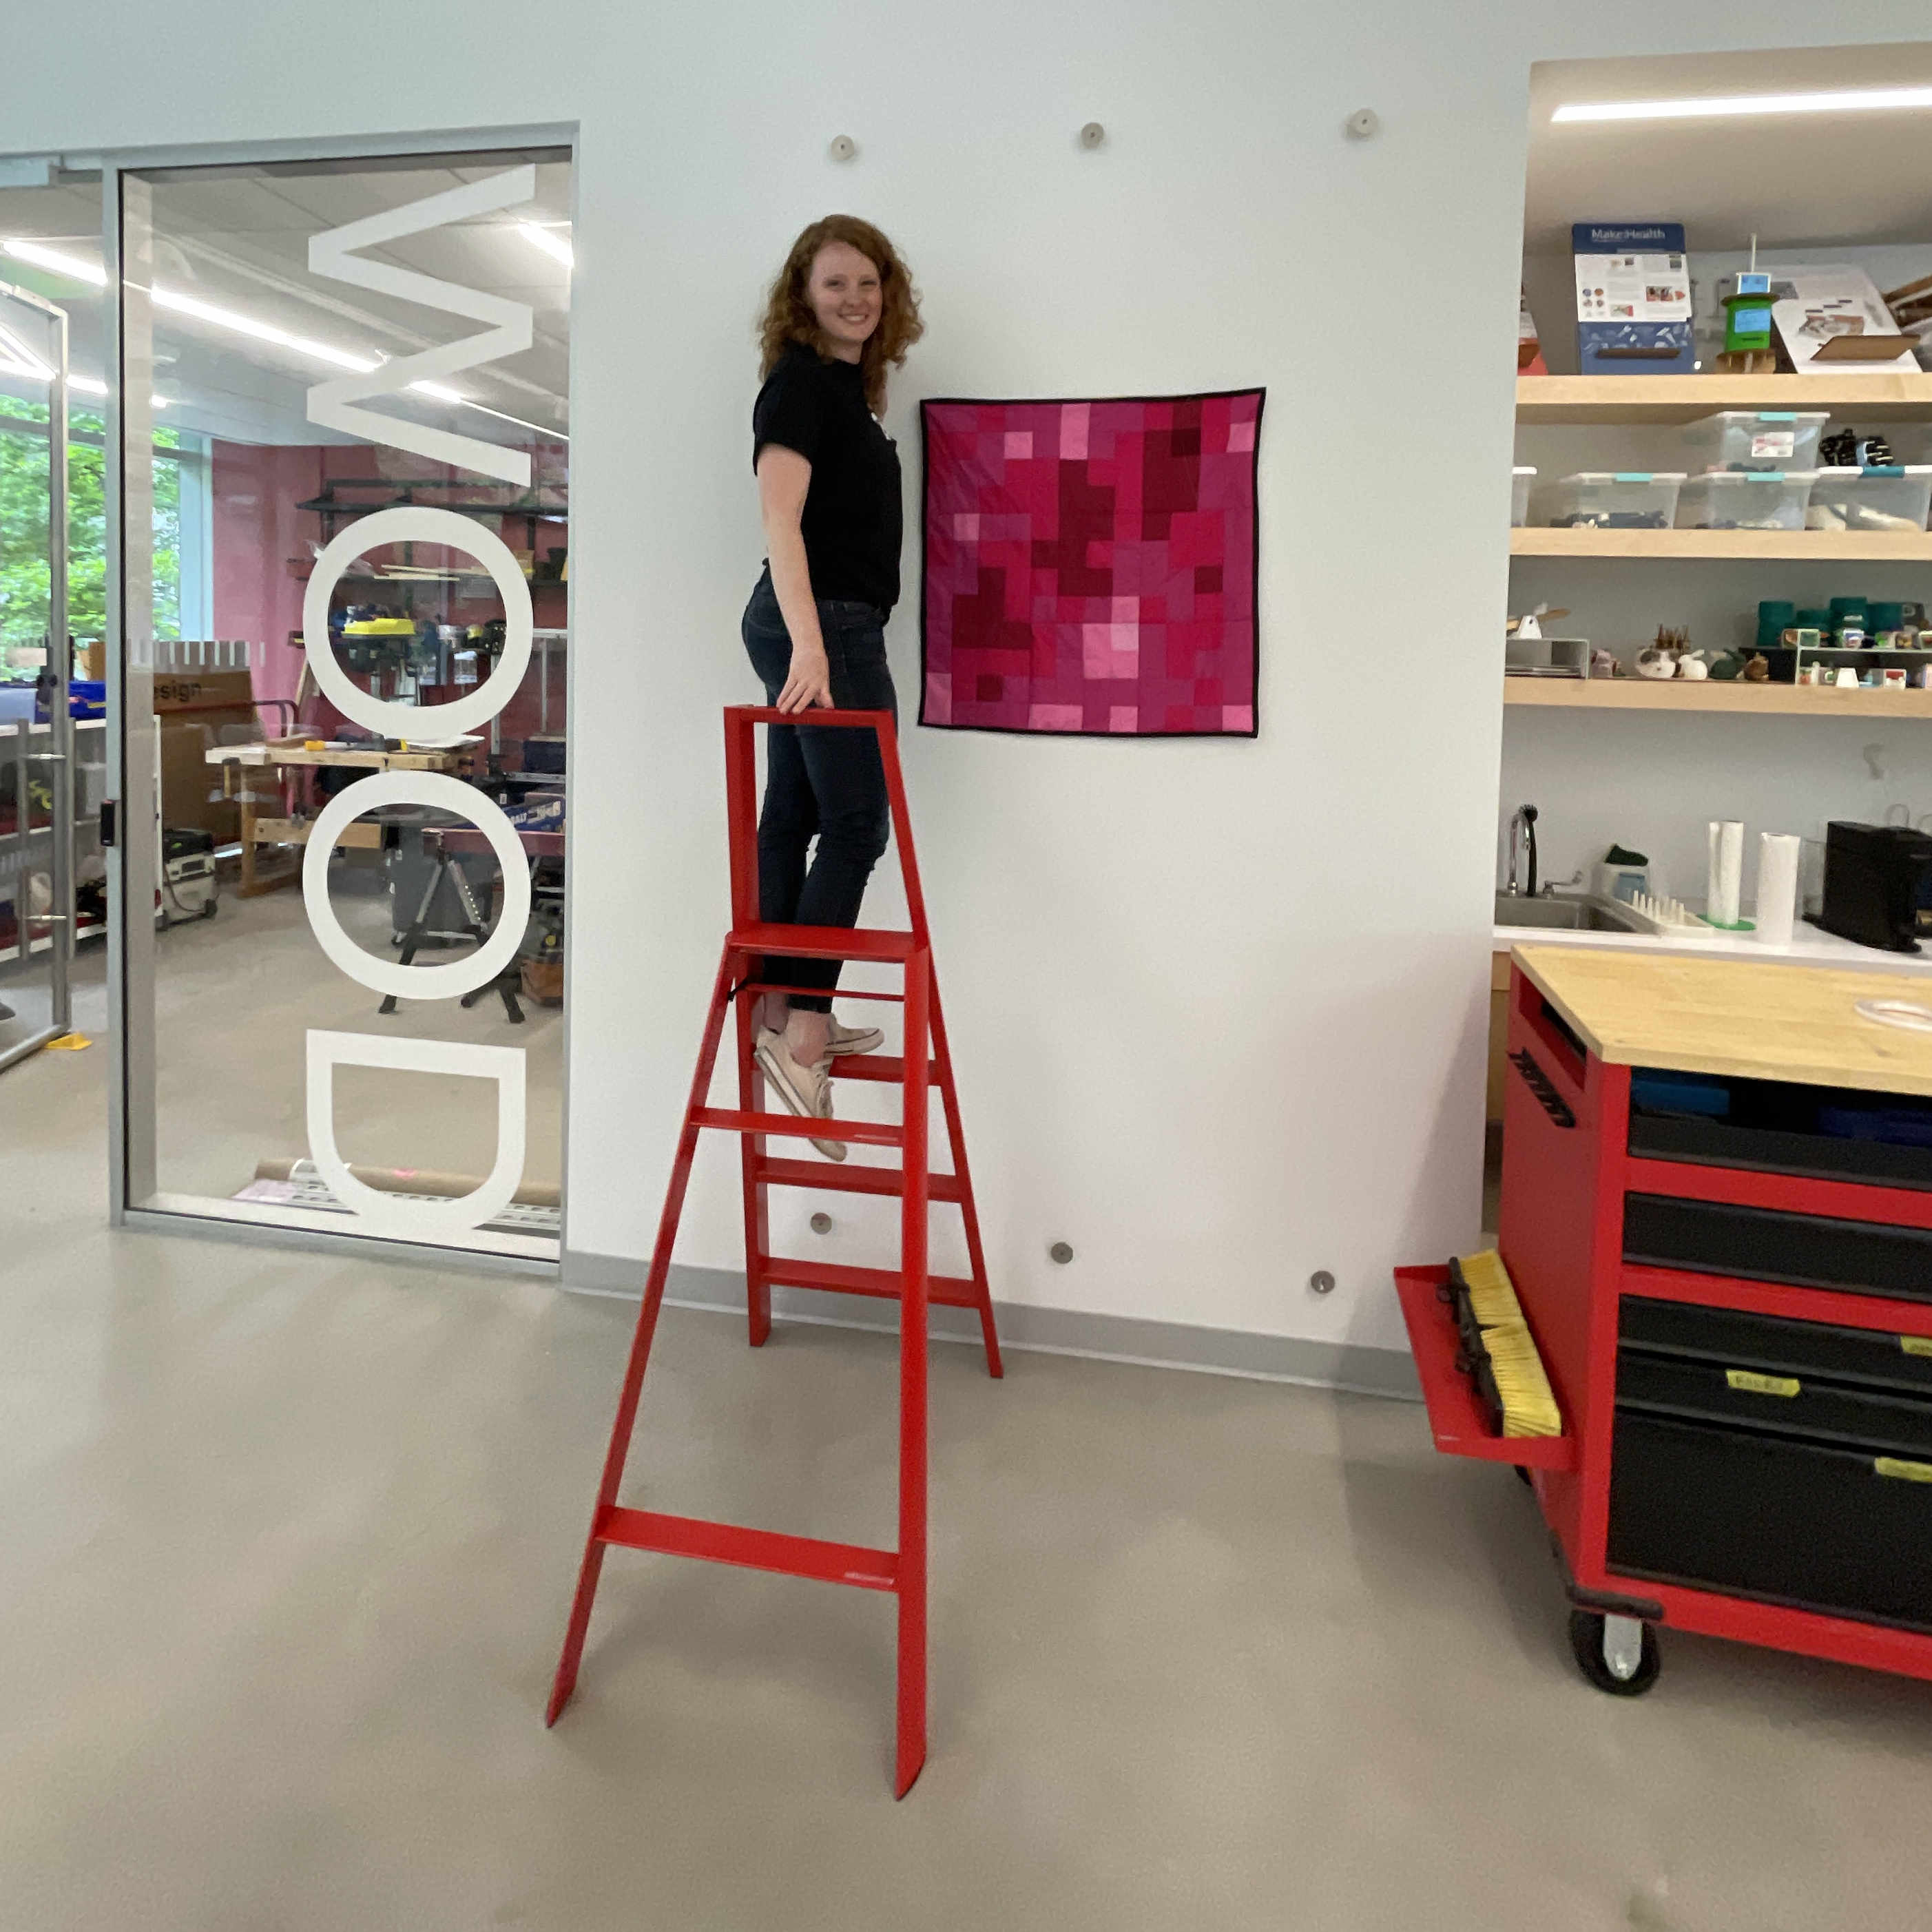
This was on display for the Spring 2025 Open Studio event at Cornell Tech.
There is something unique and strange about seeing the quilt in a physical space. It feels like it's at a different resolution than the rest of the world, and the saturated pinks are a surprising color in their context.
The process was rewarding and I have plans for more in this concept.